MOHPA Terrain Editor
1. Basics
The
terrain editor is fully integrated in radiant, allowing you to create and
modify terrain geometry in radiant. From the file menu select �New Terrain� to create
a flat terrain. Terrain heights can be adjusted using various brushes in the
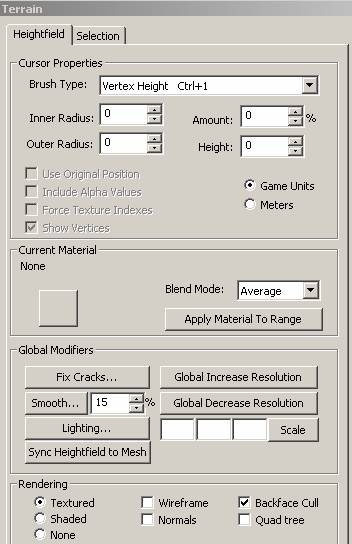
terrain tool. To view and modify the brush properties go to the edit menu and
click on �Terain Mode�. The following dialog box will be displayed:
Now you can move the mouse
cursor over the part of the terrain you wish to edit, you will now notice
a� shape on the terrain wherever the
mouse is. Depending on the brush type selected, clicking on the left or right
mouse buttons will perform a different function.
2. Cursor Properties
Brush Types
Vertex Height: This brush allows you to increase the height at the
selected position by holding the left mouse button, or decrease it by holding
the right mouse button.
Vertex Smooth: This tool has two modes, the first one you get by
holding the left mouse button over an area you want to smooth, this results in
a smooth that averages the terrain down. By holding the right mouse button, you
can average the terrain up, which results in a subtle raise.
Cut Area: This tool will cut out square piece of the terrain,
useful for making tunnel entrances or caves. You can carve holes by left
clicking where you want the hole and you can cover holes by holding down the
right mouse button outside of the hole and then moving the mouse in the direction
of the hole.
Copy Area: Copies
an area of terrain.
Paste Area: Pastes the last copied area of terrain.
Texture Paint: Select a material from the control panel on the right
and then hold the right mouse button on the area of the terrain you wish to
paint that texture on.
Increase Resolution: Allows you to increase the resolution of a quad of
the terrain by clicking on it. It is recommended that you look at the terrain from
a top-down position when increasing or decreasing resolution. There are cases
in which looking from a perspective will be misleading. To view the terrain
from a top-down perspective, select the menu option Camera->Top then
zoom out using the right mouse button (don�t forget to set the camera mode with
F5).
Decrease Resolution: Works in the same fashion as Increase Resolution.
Level Height: This tool will remember the height of the terrain at
the position where the left mouse button is initially clicked and as you move
the mouse it will smoothly level the terrain to that height. It�s useful for
flattening areas of terrain.
Bring to Height: This tool allows you to type in a height on the
control panel on the right and then by holding the left mouse button on the
terrain will raise or lower the terrain until it reaches the desired height.
Additionally, you can right click on any point on the terrain, this will sample
the height at that point and fill in the edit box appropriately, this is useful
for bringing two or more parts of the terrain to the same height.
Vertex Smooth: This tool must be used carefully. It will remove
any underlying high-resolution height data that the terrain may contain and set
it to the currently visible resolution.
Brush Properties
Inner Radius: Radius of the inner circle
of the brush to be used to modify the terrain.
Outer Radius: Radius of the outer circle of the brush to be used to modify the terrain.
Amount: The �strength� at which a given brush type is
applied with.
Height: Used with the Bring to Height brush type to
raise or lower terrain to a specified height.
Meters/Game Units: Size of the terrain quad pointed to by the mouse in
meters or game units.
3. Current Material
A
visual representation of the material
that gets applied to the entire terrain, underneath any other materials.
Clicking on the box will bring up a dialog for selecting a material.
Blend Mode: Defines how the material
will be applied.
4. Global Modifiers:
Increase/Decrease
Resolution: Increases or decreases
the resolution of every quad in the terrain by one. Care must be taken when
using this tool, it could result in a long time as it increases the resolution
or every node in the terrain. It could also result in running out of memory,
which can produce undefined behavior.
Smooth Terrain: Will remove any underlying high resolution height
data from the terrain, creating a WYSIWYG representation of the terrain. Care
must be taken when using this option if you do not want to lose the underlying
height data.
Scale: Allows you to change the scale of the terrain
Fix Cracks: Removes visible cracks on the terrain caused by
raising terrain at different resolutions. (It is NOT necessary to fix cracks
before exporting, the export process will fix the cracks before exporting).
Lighting: Brings
up a dialog that allows you to set the color of the diffuse light and the
ambient light. These values will be used
for the real-time lighting in MOHPA, but not for the generated light maps.
The diffuse and ambient colors for the light maps are set when you run
bsp_lightmap from the MOHRadiant bsp menu. See the light
mapping documentation for details
Synch Heightfield to Mesh:
5. Rendering
Sets the rendering modes
used in the 3D preview window.
6. Selection Tab
5. File Menu
New Terrain: Creates a new flat terrain.
Export Terrain: Exports the terrain as a .TER terrain file.
Export Terrain as�: Exports the terrain representation into various file
formats.
Load Terrain (.ter): Imports height/resolution data from a .TER file. NOTE:
Using this option can cause unexpected artifacts due to lost height data. It is
not recommended that this is used. And if used, it is strongly recommended that
the terrain resolution is not modified.
Load Terrain (.r32): Loads terrain from a raw
bitmap file.