Light Mapping Guide
MOHRadiant can be used to automatically create light maps for your level. There are two types of light maps uesed in Medal of Honor Pacific assault � planar projection shadow textures, and model specific light maps. Planar projection shadow textures are textures that represent shadows at different layers in the scene. For example, the terrain shadows are at the lowest level, the next level up may be bushes, above the bushes would be a layer of trees casting shadows, and above the trees may be the tree tops or the tops of hills. They are called planar projections because you can think of them as a planes perpendicular with the terrain that project shadows down on objects below them. This is how the game is able to render the appropriate shadows on to different objects at different levels. A special type of planar projection textures are called �insets�. Insets are smaller areas of the map where you want to have more detailed shadows. The second type of light map, model specific light maps, are just the typical light maps you would normally use on walls or other objects. They are model specific because they are only used on one specific model and not over the whole scene like the planar projection maps. Model specific light maps are used by models that would not work well with planar projections. For example a building that has vertical walls would not work with a planar projection because the light map for the wall would reduce to a single line on the planar projection. For this reason, individual light maps are created for the model.
The modeling program (MilkShape�s MDK Material Editor) determines which kind of light map to use. If you set the material to default-lit-lightmap, a models specific light map will be expected. Also, the model is expected to have a second set of texture coordinates for the light map. If another type of material is used, for example, default lit, then the planar projection light map will be used. Additional texture coordinates are not necessary for this type of light map since the game will automatically generate them. For planar projection type light mapping, you need to set the shadow map level to use. This can also be set in MilkShape using the MDK Material Editor. If you are using assets that are already used in the game, you don�t need to do anything, since they already have this information set.
����������� MOHRadiant can be used to initialize the necessary information for creating light maps. The first thing you should do is create the insets for the map. There is a limit of 3 insets for a map. These are areas where you need to have more shadow detail than normal. To create an inset, drag out a brush over the area you want to use for the inset, using the 2D XY Top view. Then go to the �Selection� menu, and select �Insets�. This will give you the choice of assigning this brush to be Inset 0, Inset 1, or Inset 2. The next thing you should intitialize is the shadow texture names. This information is stored with the world spawn data. You can edit this information by selecting a brush in the scene and typing �n� to bring up the entity dialog:
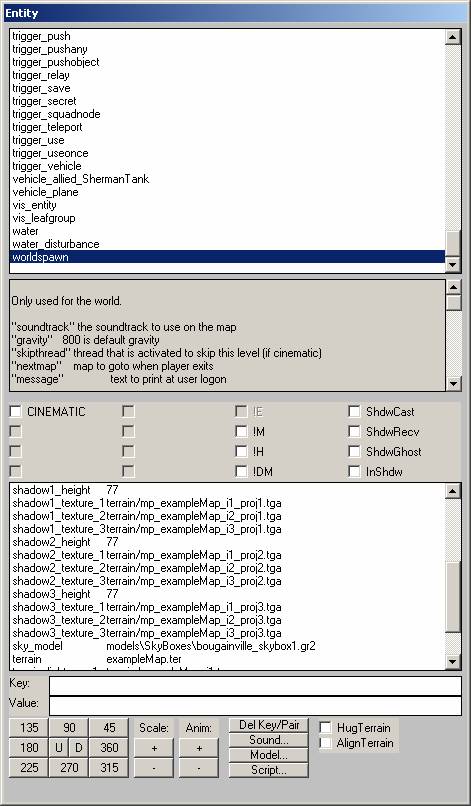
Notice that in this example there are the following shadow textures:
shadow1_texture_1, shadow1_texture_2, shadow1_texture_3 �
The naming convention is: shadowN_textureM, where N is the layer number, and M is the inset number + 1. These keys an values can be added by typing them into the Key and Value fields of the entity dialog. The value corrisponding to each of map keys are the texture names that the light map generating code will save the light maps to. They are also the names that the game will use when rendering the scene with these light maps. You should also include the key value pairs for the terrain level light maps:
terrain, terrain_lightmap_1, terrain_lightmap_2, etc
To summarize, here is a table that defines all of the possible light map layers:
Lightmap Name�������������������� Level�������������� Inset
"terrain_lightmap_1" ������������� Level 0 ���������� Inset 0
"terrain_lightmap_2" ������������� Level 0 ���������� Inset 1
"terrain_lightmap_3" ������������� Level 0������������ Inset 2
"shadow3_texture_1" ����������� Level 1������������ Inset 0
"shadow3_texture_2" ���������� Level 1 ��������� Inset 1
"shadow3_texture_3" ���������� Level 1 ��������� Inset 2
"shadow2_texture_1" ���������� Level 2 ��������� Inset 0
"shadow2_texture_2" ���������� Level 2 ��������� Inset 1
"shadow2_texture_3" ���������� Level 2 ��������� Inset 2
"shadow1_texture_1" ���������� Level 3 ��������� Inset 0
"shadow1_texture_2" ���������� Level 3 ��������� Inset 1
"shadow1_texture_3" ���������� Level 3 ��������� Inset 2
Type �n� again when you are done with the entity dialog.
You can set up the position of the light that will be used by the light map generator by using the Terrain editor. Bring up the terrain editor by gong to the Edit menu and selecting Terrain Mode, or typing Ctrl+Alt+t. In the �Global Modifiers� section of the Terrain dialog click on the �Lighting�� button. It will bring up the following dialog:
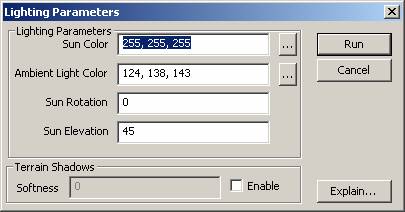
The position of the sun is given by 2 angles. The �Sun Rotation� is the rotation relative to North (0 degrees). The �Sun Eleveation� is the angle the sun makes with the horizon. The �Sun Color�� and �Ambient Light Color� are not used when creating the light maps. However, they are used by the game when rendering sunlight and ambient light in real-time. Click on Run to save the changes and to create a lighting preview in mohradiant. Note that mohradiant can not preview light maps, so you won�t be able to see a preview of how the level will look with light maps.
The light map generator will create light maps for the terrain based on either the height field information or the triangle information. If the height field information is available, it will use that, because it is more accurate than the triangle information. To make sure the light map generator uses the height field be sure to save the .r32 terrain information. From the File menu, select �Export Terrain As ��. This will bring up a save file dialog which will allow you to save the .r32 file to your terrain_source folder.
Starting the Light Map Generation
Now that the above steps are completed, you are now ready to create the light maps. From the bsp menu, select �bsp_lightmap�. The following dialog is displayed:
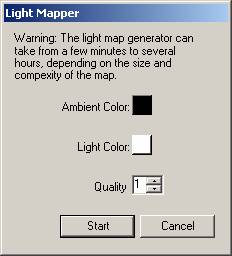
Click on the Ambient color box to bring up a dialog for selecting the ambient color. For most scenes a dark gray works best. This will be the color of the shadows in your scene. Similarly click on the Light Color box to select a color for the light. White works well, but you can experiement with shades of yellow or orange for different times of day. The qualty selection ranges from 1 the quickest, but also the worst quality to 3 the slowest but also the best quality. You might want to start with 1 for the quality to see if the colors are what you want, then use 2 or 3 for the final light maps. The light mapper will place the light maps in the folder specified earlier in the worldspawn data. Typically light maps are placed in the terrain folder. Click on Start to begin the light map generation. As the warning says, the time can vary based on the complexity of the map. This includes the number of models and the number of polygons in the level (including the terrain). When it�s done, you can then run the map in the game, and see the light maps rendered in the level. You can either use the light maps as they are generated, or edit them in PhotoShop or another image editing program to improve their appearance.