- Its
better to have too big of a terrain than too small.� You can always later decrease the
resolution on non-visible terrain quads to increase framerate.
- You
can only have up to 3 textures on any 1 quad.
- A
good, framerate friendly quad size is between 1024x1024 to 2048x2048 units
per quad.
- Ctrl-Shift-Z
is undo for terrain operations.
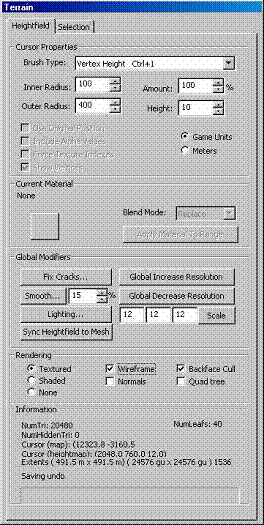
Working With Terrain:
There are a few primary Brush Types in the terrain editor
that do most of the work. They all use the Cursor Properties values at the top
of the Terrain Edit window to modify how they work.
Inner Radius � all the terrain within the inner radius of the
cursor, represented on-screen as the red disk, will receive the effect of the
terrain operation chosen in the Brush Type box uniformly
Outer Radius � The effect of the terrain operation will drop off
proportionally from full affect at the edge of the red inner radius disk to no
affect at the edge of outer radius disk in blue-green.
Amount � Adjust this to control how quickly the terrain operation
is applied to the existing terrain.� High
values alter terrain quickly, low values change it more subtly.
For the terrain painting brush,
think of the Amount as the % that you will be
painting your new texture on top
of the previous terrain textures. A value of 10 would
be a slow 10% sprinkle. 90 would
be a quick 90% solid spray of texture.
Height � When adjusting the terrain height, positive values will
make the terrain go up, while negative values will make it go down.� Making this value very big (or very negative)
will have an effect similar to adjusting the Amount.� For operations that involve sampling the
current height of your terrain mesh, this will display the current height
sampled by the cursor.
Game Units/Meters � This simply switches the units of the preceding
4 parameters from Radiant units to real-world meters.
The Brush Types:
Vertex Height (CTRL+1)
Use this command to raise or lower
your terrain within the cursor in the 3D or 2D windows by clicking the left
mouse button.� The amount affects how
much the terrain will be altered by your mouse click.� Positive Height values raise the terrain,
negative values lower it.� A larger inner
radius will apply the
Bring to Height (CTRL+2)
As you move the red dot
representing your cursor across the surface of your terrain, you will see the
disk representing the inner and outer radius matches the height of the current
section of the terrain.� Clicking the
Left Mouse button in this mode will bring the terrain within the cursor disk to
the height of the center of the disk.
Set to Height (CTRL+3)
This operation will set the
terrain within the cursor to the value entered in the Height field
Vertex Smooth (CTRL+4)
This will smooth the terrain
within the cursor radius.
Vertex Noise (CTRL+5)
This will add noise to the terrain
within the cursor radius
Cut Area (CTRL+X)
This will cut the terrain
underneath the cursor, leaving the area flat
Copy Area (CTRL+C)
This will make a copy of the
terrain underneath the cursor, leaving the area untouched.
Paste Area (CTRL+V)
This will place a previously cut
or copied section of terrain into the area under the cursor.� How this is applied to the terrain is
dependent on the Blend Mode setting.� See
the Current Material Section for
more details.
Texture Paint (CTRL+6)
This will paint the material shown
in Current Material box to the area within the cursor radius, but only if the
Material has been added to that quad.�
See the Current Material section
for more details.
To directly set what available
textures are being used on a particular Quad, in the 3d window shift-Right
Click on a Quad to bring up a list of�
textures. On this list, textures that are checked can be painted on that
particular Quad. There can be only 3 textures per Quad!!!
Texture Unpaint(CTRL+7)
This will remove the currently
selected material from the quad and replace it with the base texture.� In order to repaint the material onto the
quad, you need to re-add the texture to the quad by using Shift Right Click.
Increase Resolution
This will increase the resolution
of the quad highlighted in red, forming 4 new, higher resolution quads in the
same area as the previous quad.
Decrease Resolution
This will decrease the resolution of the quad
highlighted in red, creating a larger, lower resolution quad from the selected
quad and 3 other neighboring quads.
Sync Heightfield to Mesh
The nature of quadtree terrain is
that it is defined by continuous data, or a heightfield, that is capable of
storing the terrain information in greater resolution and detail than what is
actually displayed in Radiant.� By
increasing the resolution on quads, the actual mesh more accurately represents
the continuous heightfield data.�
However, if you wish to discard the high-resolution data for a quad on
your terrain, and instead replace it with the lower resolution that is shown in
Radiant, you can apply this function.� By
doing this, you are, in effect, locking in the lower resolution into your
heighfield.���
Model Placement:
����������� 100% of what
you see for level Geometry in Pacific Assault is now statically placed models.
Brushes, as they have been traditionally used, are now obsolete and should not
be used for level geometry.
����������� Getting
started with placing models is very simple. Just right Click on the 2d top down
view and navigate in the menu to �models� and the pull-out menus from there.
The majority of the vegetation assets are under �models/mission4/naturals� and
�models/mission5/naturals�.
Useful commands for working with Models:
Shift-left Mouse����������������������� Selects
what you are clicking on.
H�������������������������������������������� Hides
selected entity.
Shift-H������������������������ Un-hides
all hidden entities.
Spacebar��������������������������������� Duplicates
selected entity.
Ctrl-Spacebar������������������������� Duplicates
selected entity with same key-values.
R��������������������������������������������� Toggles
rotate. Instead of moving when the model is dragged, the model will now rotate.
Ctrl-Shift-E����������������������������� Toggles �Terrain
Hug� on selected entity. Useful for roughly placing a model on the terrain.
Select->Randomize
Entities������ Opens a window that will
allow you to �randomize� the selected entity�s rotation and scale. Very useful
for randomizing large amounts of models.
Trigger Volumes:
����������� For every
objective in an Invader map, there is an event that happens when players move
to a designated place and do an action. The game uses volumes called Triggers
that are placed in the level to determine when a player is at the right place,
performing the action for an objective.
For some objectives like an
occupation, players merely have to stand in a trigger volume. Other objectives
have more complicated game play such as planting a bomb or activating a radio.
Complicated objectives may have several trigger volumes that are placed in
order to facilitate the game play.
Making a trigger volume is very
simple. Create a brush volume by left clicking on the 2d window and dragging
out the appropriate sized box. Make sure the trigger has is slightly taller
than the player. Give your box the �trigger� texture by selecting your box,
pressing �S� for the surface editor and then in the Texture Name field, type in
�common/trigger� and then hit OK. Your box should now have a green transparent
texture with the word �trigger� tiled across it. Lastly, to convert your brush
to an entity, select your brush, right click and in the menu select
classes->Trigger->Multiple. Most all of the triggers in invader are
Trigger_Multiple. A few triggers are Trigger_Use.
Below are some guides as to how to
make machine guns and barricades work.
�Machine Guns:
����������� There are 4
things you need for a static machine gun. The machine gun .hag model. A
trigger_use entity for using the machine gun. The model for the ammo-box. A
trigger_multiple for reloading the machine gun.
����������� The Base
model. This is going to be the tripod model on which the machine gun will
operate. For the TKO maps, we used models/statweapons/model92mp_base_stand.hag.
Place this model where you want the base of the machine gun to be.
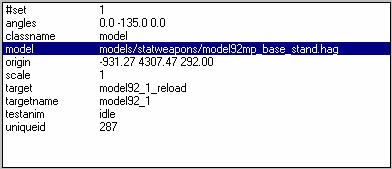
Key ���������������� Value
#set����������������� number this is an identifier for the particular
machine gun you are
setting up. In this example, this machine gun is
the only machine gun in the map so I have given it �#set 1�. A second machine
gun elsewhere in the map would have a key value of �#set 2�, ECT.
target��������������� reload_trigger�� the machine gun model targets the
triggerl_multiple you
will set up for the reload_trigger.
In this case, the reload trigger for this machine gun is named
�model92_1_reload�.
targetname������� model92_1������ the unique name for the machine gun base
model.
����������� A
trigger_use. This is the volume that players can operate the machine gun
from within. Make a brush the size that you want for the trigger and convert it
to the appropriate entity by right clicking on the brush and selecting
classes->trigger->use. Place this trigger right behind the machine gun
where you�d want players to use the machine gun from. The trigger should also
be taller than the player.
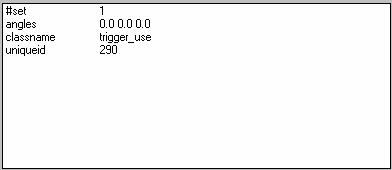
Key ���������������� Value
#set����������������� number this is the same value that was set on machine
gun base
model.
����������� The
Ammo-box. Place the model models/weapons/mg_ammostack/mg_ammostack_axis.hag
where you want the ammo-box for the machine gun to be.

Key ���������������� Value
#gunammo������� 1
target��������������� machine_gun_base������� the ammo_box model targets the machine
gun base
targetname.
����������� A
trigger_multiple for reloading the gun. Make another brush that covers the
ammo-box model you placed. Convert this brush by right clicking and selecting
classes->trigger->multiple. *Important* this trigger cannot touch the
trigger_use that was set up behind the machine gun. This trigger volume should
also be taller than the player.

Key ���������������� Value
targetname������� reload_trigger_name���� the targetname for the reload trigger needs
to be
unique.
Barricades:
����������� There are 4
things you need in order to make a working destructible barricade.� The Barricade Model, the bomb model, a
trigger_multiple that players stand in to arm/disarm the bomb, a
trigger_multiple to take damage for the barricade from explosions.
The Barricade Model like
models/mp_common/manmade/tank_barricade_med.hag.

Key ���������������� Value
targetname������� unique_targetname������� The barricade needs a unique targetname.
The c4-bomb model, which is
models/mp_common/manmade/us_demolitionpack_nologic.hag.

Key ���������������� Value
target��������������� bomb_plant_trigger������ The bomb model must target the trigger
volume that
players will arm
the bomb from.
targetname ������ unique_targetname������� The bomb model must have a unique
targetname.
A trigger_multiple from which players will be able to
plant the bomb.

Key ���������������� Value
setthread��������� global/mp_defuse_bomb.scr::proximity
targetname������� unique_targetname������� the trigger_multiple volume must have a
unique
targetname.
A trigger multiple that will take damage from
grenades and satchel charges.

Key ���������������� Value
�Not_players� and �Damage� must be checked.
targetname ������ unique_targetname������� the targetname must be unique.
Water:
����������� Setting up
water in MOHPA is similar to what other games
have. First, create a brush the size of the water volume you want. Next, Right
Click on your brush an make it into a water entity by selecting
classes->water.
����������� Here�s an
example of the ocean from bougainville.

As far as what type of water to check,
you�re best to stay with �Ocean� to begin with. It�s the most efficient of what
is available. Interactive water will do fancy interactive water type behavior
when shot but is expensive to render. Reflective water will reflect the
environment around it but it�s basically like rendering your scene twice.� The FFT water types do not work.
Key����������������� Value
Num_nodes����� even_integer���� Num_nodes is a key that allows you to set
how
many vertices will be in your
water. A lower num_nodes value will result in a lower detail but faster
rendering water.
Materialname��� material����������� materialname will assign a specific
material to be rendered
on your water.�
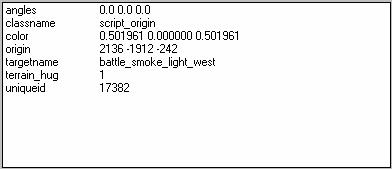
Visual Effects:
����������� In
multiplayer, the TKO scripters have given level builders a simple method to play
visual effects such as battle smoke and ambient explosions.
����������� First, your
level must have a working level script. Take the example script and modify it
to match your level. Make sure that the following line is being called at the
beginning of your script.
����������� exec
global/mp_fx.scr
����������� To place a
visual effect, first create a script_origin at the location you want the effect
to play at. To set what effect to play give your script origin a targetname
selected from the list of effects below. Here is an example of a battle smoke
effect from Bougainville.
����������� There are
also some special parameters used for explosion effects. Here is an example of
an explosion effect from Bougainville.

Key����������������� Value
#delay������������� integer
delay���� this is the delay between
volleys. There is some
randomization
built in so this delay will not be constant.
#minVolley������ integer������������� this is the minimum amount of
explosions that will happen
each time the
effect goes off.
#maxVolley����� integer������������� this is the maximum amount of
explosions that will happen
each time the
effect goes off.
#minRange������ integer������������� this is the minimum range (in
units) that explosions will be
spaced from each
other in each volley.
#maxRange����� integer������������� this is the maximum range (in
units) that explosions will be
spaced from each
other in each volley.
#spacing���������� decimal this value controls the time between explosions
in a volley.
Effects available in MP_FX.scr