MDK MilkShape 3D
Tools � For MOHPA
Author: Narayan Brooks
Company: TKO-Software
Date Last Modified: 12/17/04
Overview
The MOHPA Developer Kit MilkShape 3D Tools are a set of plugins developed for the MilkShape 3D (hereafter referred to as MilkShape) modeling package that allows users to create content for Medal Of Honor: Pacific Assault (MOHPA).�� The tools consist of an MDK Importer, MDK Exporter, MDK Model Manager, and MDK Material Editor.� All of these tools are accessed through the menus in MilkShape.
The MDK Importer imports existing MOHPA model and animation files (.gr2, .MOH) and creates meshes, bones, materials, and animations in MilkShape.� MOHPA models and animations require extra information, besides their geometry, to run in the game.� This �extended data� is stored in the MDK Model Manager.�
The MDK Model Manager provides access to the variables needed by MOHPA to use the model.� Using the Model Manager you can limit what items get exported, determine which items are collision and which are visible geometry, and set the properties of the MOHPA objects.� The importer automatically populates the Model Manager with the necessary data.� Models and bone created from scratch need to be added to the Model Manager to create the necessary properties needed by the exporter.
The MDK Material Editor allows full access to the properties of the MOHPA materials.� The material editor also allows access to the existing MilkShape material functionality.� The editor can be used to add new MOHPA materials, which will also add materials to MilkShape.� The Material Editor lets existing MilkShape materials be converted to MOHPA materials as well.
Models that have been imported or created in MilkShape, and added to the Model Manager can be exported as game ready .MOH files using the MDK Exporter.� These files can then be used just like any other existing game assets.
The MDK Animation Sequencer allows for the import and export of animations to and from MilkShape.� The MDK Animation Sequencer Importer imports an existing animation onto an existing skeleton.� The MDK Animation Sequencer Exporter exports animations created or modified in MilkShape in a game ready format.
�
Each MilkShape tool in the MDK is described in detail below.� Tutorials for the tools can be found in Appendix A.� General MilkShape 3D information, FAQs, forums, and tutorials can be found at: http://www.swissquake.ch/chumbalum-soft/index.html.
NOTE: Windows 2000 users: The tools create dialogs with pull down menus in them.� Some Windows 2000 systems would not draw the pull down menus when you clicked to expand them.� The functionality of the drop down menu is still there available even though they may not draw correctly.� The menu items can be accessed by clicking in the drop down menu, and either using the scroll wheel on the mouse, or the up/down arrow keys to select items in the pull downs.
MDK Model Manager
The MDK Model Manager is used to make models created or imported into MilkShape usable by MOHPA.� MilkShape does not natively support extra information attached to the bones, meshes, and materials in the scene.� The Model Manager is used to create and alter the necessary data for the meshes, bones, and animations in the scene.
The Model Manager is accessed through the main menu bar under: Tools > MDK Model Manager (Figure 1).
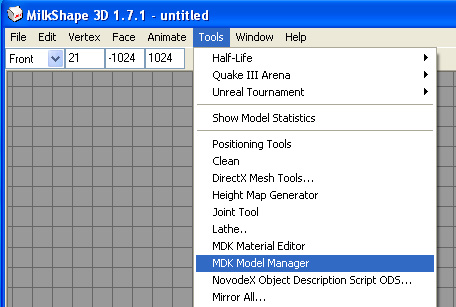
Figure 1: Accessing the MDK Model Manager from the toolbar.
Clicking the MDK Model Manager menu item will open the Model Manager GUI.� The GUI provides access to all of the functionality of the Model Manager.� If nothing has been added to the scene, you will see the empty Model Manager (Figure 2).
Model Manager
Layout
The Model Manager is set up in two parts.� The left side of the Model Manager is the Model Tree View (MTV).� The MTV is how the user adds/removes items from the Model Manager, as well as select the desired item to change the extended data of.� The right side contains context sensitive options for the item selected in the MTV.� The Model Manager consists of a single skeleton, and at least one (but could be more) renderable.� The skeleton is where the bone extended data information is kept, and the renderables are where the mesh data is kept.
A renderable contains the mesh information for a model.� This includes collision and level of detail (LOD) info.� The collision is invisible in the game, but is what you walk on and collide with.� The LOD is what you see in the game.� MOHPA allows up to five levels of detail for a model.� This allows for lower resolution meshes to replace higher resolution meshes when the player is farther away from the item.
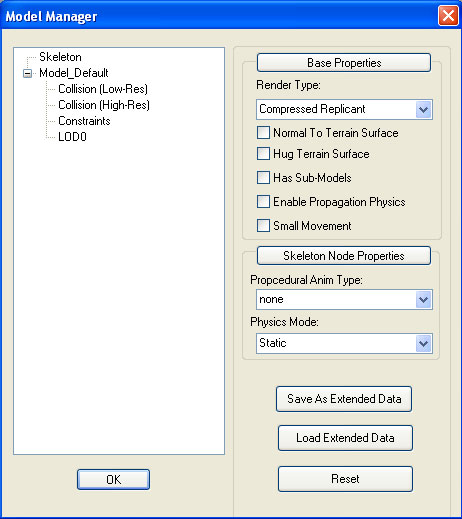
Figure 2: The empty Mdk Model Manager. �The object tree on the right is the Model Tree View, the left side of the dialog contains context sensitive properties based on what is selected in the Model Tree View.
Model Manager
Functionality
Interacting with the Model Manager
Right-clicking items in the MTV access functionality of the Model Manager.� This pulls up a context sensitive menu based on what you have selected.� The primary functionality of the right click menu is to add items to and remove items from the different categories in the Model Manager.� Once an item is added to the Model Manager, the item�s extended data becomes available to change.� An item will only get exported if it is in the Model Manager.� If an item is removed from the model manger, it will not be exported, and the extended data for the item is deleted.�
To add items to the Model Manager, they must be selected in MilkShape before the Model Manager is launched.� Then right click on the desired category and select the Add Selection to � option (Figure 3).
Items can be removed from the Model Manager the same way they can be added.� Right-click on the item (or category to remove all items under it), and choose the Remove� option in the popup menu.
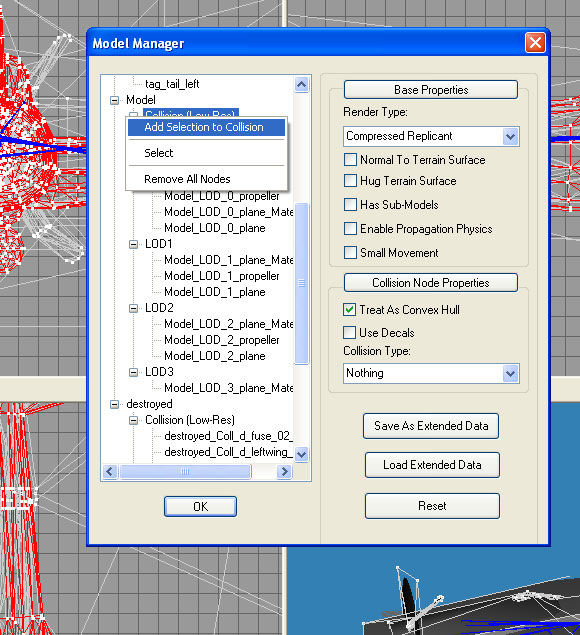
Figure 3: Adding pre-selected items to the low-resolution collision of the Model Manager.
NOTE: Because the Model manager is modal (all MilkShape functionality pauses until the dialog is closed) the selection of items to add needs to be done before the model manger is launched.� To change selections, close the Model Manager and select different items, then open the Model Manager again.
Extended Data Persistency
A .MOH file contains all of the geometry for the objects as well as the extended data.� When an item is imported, the extended data is automatically entered in the Model Manager.� When an item is exported, the extended data is saved with the item in the same file.� When you are working on an item from scratch, or modifying an existing item, you may not want to export your .ms3d MilkShape as a .MOH file.� If you close MilkShape, or open a new file you will lose all of your extended data in the Model Manager, even if you have saved your .ms3d file.� To save your extended data, use the Save As Extended Data button.� This writes out the extended data to a .mmd file.� You can then load the extended data using Load Extended Data when you reopen your .ms3d file.� This allows for your extended data to be persistent so you do not have to redo all your work each time you work on a .ms3d file.� The .mmd file is a text file, so you can use it as a (rather cryptic) debugging tool if needed to see if you are outputting the correct values.� You can also use this to see what properties existing models have.�
NOTE: When you load extended data into the Model Manager, you have to close and reopen the Model Manager for the loaded data to show up.
Collision
The Model manager lets you specify both high (Collision (High-Res)) and low (Collision (Low-res)) resolution collision geometry.� For efficiency sake, collision geometry is usually a lower resolution version of the visible geometry.� The low-res collision is required if the item is going to be collidable in the game.� The high-res collision is optional and lets you specify more accurate collision.� As a side note, the developers of MOHPA rarely ever used the higher resolution collision.�
Level Of Detail (LOD)
A mesh needs to be an LOD if it is going to be visible in the game.� LOD allows you to make the level more efficient by using fewer resources rendering items that are far away.� LOD0 is the highest resolution mesh, which you see when you are closest to an item, and LOD4 is the lowest resolution version, when the item is farther away.� There must be at least an LOD0 mesh, the other LOD levels are optional, and usually only the first 3 levels are used.
Which LOD you view in the game is dependent on your proximity to the item, and governed by the LOD�s switch distance.� Once you are farther than the switch distance away from the LOD, if an LOD exists for that distance, it will be swapped for the current LOD.� Right clicking on the renderable and selecting Edit LOD Switch Distances in the pop-up menu sets the LOD switch distance.� This brings up a dialog that lets you set the switch distances for all active LODs for the renderable.� Initially there is only one level of detail (LOD0) in the Model Manager, but other levels can be added by right clicking on the renderable in the MTV and selecting Add LOD.�
NOTE:� The default LOD switch value is 0.0; so if you only see the lowest resolution mesh in the game, check your LOD levels.
Extended Data Properties
The dropdown menus, check boxes, and edit boxes on the right side of the Model Manager provide access to the extended data.� On import, the extended data is filled in from the file.� If an item is added to the Model Manager manually, default values are assigned.� Extended data can also be saved to or loaded from a .mmd file.
The properties displayed are context sensitive and only change the values of the currently selected item in the MTV.� When you select an item in the MTV, all of the valid properties for the item are displayed.
The dropdown menus in the Model Manager are populated using text files, but the values are hard coded in the game, so changing the text files is not advised.�
Bones and Skeletons
There can only be one skeleton per scene, meaning there can only be one root bone, with other bones attached to it if desired.� Bones have a Procedural Animation type and a Physics Mode.� The procedural animation type is used for grass type swaying effects and requires specific bone names and hierarchies to work.� The typical default value is none.� The physics mode can be Static (object does not move), Game-Driven (the object can be moved around the world through collisions) and Physics-Driven (rag-doll type interactions with the world).
Synch To Scene
Every time the Model Manager is opened, it removes model manger items that are no longer in the scene.� The data for those items will be lost.� Keep this in mind when you are deleting items in the scene.
MDK Importer
The Mdk Importer is used to bring existing content into MilkShape for editing, modification, and/or re-exporting.� The importer creates all of the meshes, vertices, bones, materials, and animations in MilkShape that are in the source .MOH (or .GR2) file.� The importer also populates the Model Manager with the extended data in the file.

Figure 4: Accessing the Mdk Importer from the File menu.
The importer is accessed through the MilkShape File menu: File > Import > Mdk Importer (.MOH) (Figure 4).� This launches a file chooser dialog that displays all of the .MOH and .GR2 that can be imported into MilkShape (Figure 5).� Searching the My Documents\EA Games\Medal of Honor Pacific Assault(tm) \moddir\ <your_mod_name_here> \models directory creates the importer file list and it�s sub folders as well as the game install directory.� All� .MOH and .GR2 files as well as pre-packed .REZ, and .Pk3 files are searched as well.� This means that the game model files do not need to be unpacked in order to import them.� The models in you moddir directory will be first in the list.
To import select the file by clicking it and pressing OK.� You can double click on a file name as well.� There is a �Quick Select� text field that can be used to find files in the dialog.� Typing in the first part of the file name, or part of it, will scroll to and select the file in the dialog.� The Quick Select is case sensitive, so the name needs to be typed exactly as it appears.� Then the file can be double clicked, or OK pressed to import it.� The Scale Bones: check box will make the bones fit the mesh being imported if the model has a scale component.� This should only apply to character models.� Scale Bones should not be checked it the imported skeleton is going to be used to export animations.
NOTE: �If you have multiple files with the same name in different directories, all of those files will show up in the file importer dialog.

Figure 5: The Mdk Importer dialog box, displays existing .MOH and .GR2 files that can be imported.�� The �Quick Select� text box can be used for selecting files by name.
The importer can be run multiple times, but all existing models will be deleted and the Model Manager will be cleared, resulting in losing your extended data.� The importer will prompt you if you want to continue.
Importing and Names
MilkShape limits the name of meshes and bones to 31 characters long.� The existing content was created without this limitation.� Duplicate names are not allowed, and checked for as well.� When a name that is too long is encountered during import, a dialog will appear allowing you to rename the object to a name within MilkShape�s specifications (Figure 6).� When a name is entered, it needs to be unique, and a check is performed.� If the check fails, you will be prompted to rename the mesh again until a unique name is found (usually not hard to do).� The dialog supports copy and paste the process can be sped up a little.��
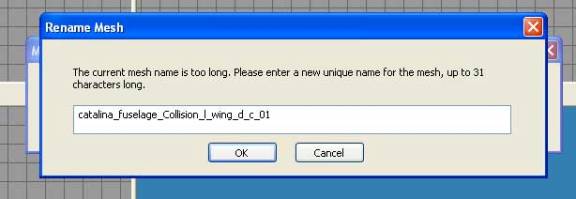
Figure 6: Renaming meshes with names longer than MilkShape supports.
The extended data relies on the names of objects in the scene to associate the data with the object.� If you change the names of objects or materials in the scene, the extended data needs to be manually changed as well, or you will lose the data when you open the Model Manager (see the note in the Model manager section).
NOTE:� Some auxiliary files such as HAG files and script files may be looking for a name of an object that had to be shortened during import.� These files may need to be altered manually to work with the new names.
Working With Imported Models in MilkShape 3D
Once a file is imported, you can use all of the native MilkShape tools and features, just as if you had created it from scratch in MilkShape.� You can save the file in MilkShape�s native .ms3d format but this only saves the mesh, vertices, bones, animations, and MilkShape materials, but none of the MDK materials or extended data.� You need to open the Model Manager, and explicitly save the extended data as a .mmd file, if you want to work on the model in .ms3d, but keep the extended data.� The .mmd format will save the MDK material information in the extended data.�
When you want to export the file you can load the extended data back into the Model Manager.� The Model Manager is only dependent on the names of objects and not their topology or structure, so geometry changes will not affect the Model Manager�s extended data.� Meshes and bones can always be added manually to the Model Manager, allowing complete control over the extended data.
MilkShape has limitations in zooming the 2D views.� Some of the existing MOHPA models are large enough that their extents cannot be viewed in the 2D MilkShape viewports.� You may need to adjust the near and far clipping planes in the 3D view as well.� One solution top the zoom limitation is to select all of the objects in the 3D viewport, (using the Alt drag method), and scale them uniformly.� Bones should be scaled accordingly as well.� When exported, these models will be smaller, but you can scale them in MOHRadiant.
Importing and Materials
For materials to show up on the objects in MilkShape, the unpacked .tga or .dds files need to live in a directory structure under the moddir\<your_mod_name_here>\models folder that mirrors the original model�s texture directory.� For instance the Arisaka.gr2 model textures would have to live in:
\My Documents\EA Games\Medal of Honor Pacific Assault(tm)\moddir\ your_mod_name_here \models\weapons\Arisaka
This is only necessary to view the materials in MilkShape.� You can always change the material paths in the MDK Material Editor and they will show up as long as it is under the models directory.� MOHPA will display existing materials from imported models as long as the material is in an existing .REZ file and the paths have not changed, even if the directory structure is not mirrored under the moddir\models\ directory needed by MilkShape.� New materials need to be added to the .Pk3 file with your re-exported or newly exported models.
NOTE:� When materials are imported, the model shows up as slightly transparent.� If you go under Materials in MilkShape and drag the transparency slider all the way to the right, the item will show up as solid.
Bones
When you import an existing MOHPA
file you have the option to scale the bones in the scene based on the scale of
the root bone in the file.� Scaling the
bones causes the skeleton to fit the mesh it is attached to.� To enable bone scaling, check the Scale
Bones box in the Import File dialog.
If you are importing a file with a
skeleton to be used for modifying or creating animations, then you should leave
the scale button unchecked.� The
existing model files have the scale coded in them, so they assume that
animations are created without a scaled skeleton.
MilkShape only allows for one bone per vertex, but the programs used to create the model files (Maya and 3DS Max) allow for multiple bones per vertex and bone weighting.� When you import a model with bones into MilkShape, the bone indices for the vertices will only take the first bone index and not the other indices.� This causes the model to be skinned wrong.� If you plan to re-export an existing model, then you need to reassign the bone weights using one bone per vertex.� Otherwise, the model will just use the first bone index it found when importing, which will lead to undesired results when you load the file in Radiant or the game (Figure 7).
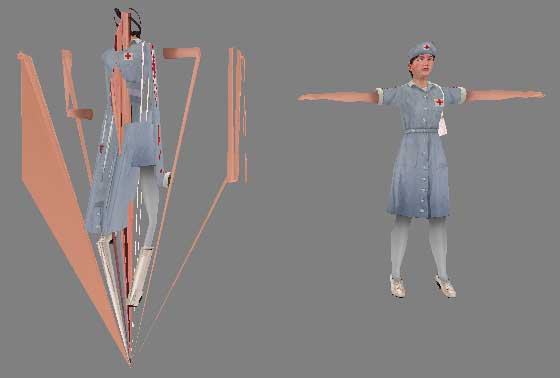
Figure 7:� An example of uncorrected vertex bone indices on re-export (on the left). The original model with multiple bone indices per vertex (on the right) has correct skinning.� The model needs to be �re-skinned� to export correctly.
Animation files are imported using the MDK Animation Sequencer.� The MDK Importer will let you know if you try to import an animation file that has no meshes in it.
MDK Material
Editor
Like the extended data for models, MOHPA requires material properties that do not exist in MilkShape.� The Mdk Material manager provides access to properties of MOHPA materials not native to MilkShape.� The material properties are stored in the extended data section of the models when exported, or saved as extended data.
The Material Editor is accessed through: Tools > MDK Material Manager (Figure 8).�

Figure 8: Accessing the Mdk Material Editor
The material editor contains both MOHPA material and MilkShape material functionality (Figure 9).
�
All of the MOHPA materials in the scene are accessible through the topmost pull down menu on the left.� Selecting a material in this pull down (Figure 10) will update the GUI to reflect the properties for that material.� The material properties can be changed through buttons, pull downs, check boxes, and text fields.�� The text fields limit values to those recognizable to the game.

Figure 9: The Material Manager.�� The MilkShape material functionality is in the top left corner, the rest affects the MDK materials.
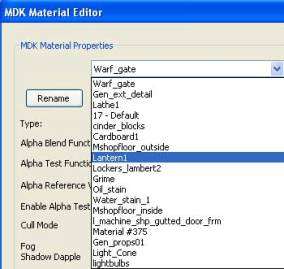
Figure 10: Selecting MDK materials using the pulldown.
Renaming Materials
To rename a material, change the name in the text box (Figure 11), and click the rename button.� Duplicate names are no allowed.� The name of the material will not be changed until you click rename.� This will rename the material in MilkShape as well as in the Material Editor and the extended data.

Figure 11: Renaming materials.
NOTE:� Renaming materials in MilkShape will not rename MOHPA materials, and that material can no longer be edited in the material editor.
Meta Materials
The rendering of materials in the game is governed by Meta Materials.� Meta materials are predefined descriptions of a material that include shader properties and reference shader programs.� The Meta materials available to you are the ones shipped with the game.� You can change Meta materials by clicking the �Type:� button (Figure 12), which brings up the Meta material browser (Figure 13).�
�
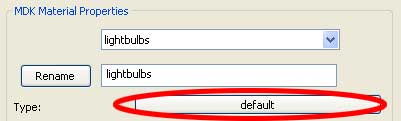
Figure 12: Changing the Meta material type for a MDK material.

Figure 13: The Meta Material Browser shows the available Meta materials for the material.
NOTE: Changing Meta materials changes the texture stages (Figure 14) in the material, which results in the source files (.tga or .dds) for the texture stage to be reset to �None�.� You will need to set these source files before exporting, or your materials will not be rendered correctly.
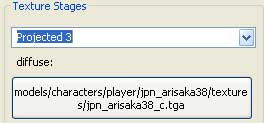
Figure 14: Texture stages.� You can change the source file for a texture stage by clicking the button below it.� Texture stages are selected by using the pull down.
Texture Stages
Meta Materials contain one or more texture stage.� These texture stages are defined in the meta material and cannot be added or removed from the material.� Changing the material�s meta material will change the texture stages.� Each stage represents a different rendering process, so a meta material can have a normal map, diffuse (the base texture you see), reflection map, etc�� MilkShape uses the texture stage with the diffuse texture as the texture displayed in the model.
Each texture stage has a source texture file that is either a .tga or a .dds.� When you select a texture stage in the drop down, the type of texture stage is displayed (diffuse, normal, reflect�) as well as the source texture filename.� You can change the source file by clicking the button and browsing to the desired file.� Changing the source file on the diffuse texture stage will change the diffuse material in MilkShape as well.
New and Converted MDK Materials
MDK materials are created automatically during import.� You can also create new materials using the material editor.� The New Mdk Material button creates a new, uniquely named, MDK material, and its MilkShape counter part.� You can also convert existing MilkShape materials to a MDK material by selecting the material and in the MDK Materials pull down (Figure 15), and pressing Convert Existing Material.� This will reset the diffuse material to �None�.

Figure 15: Creating new or converting existing materials.
Once a MDK material is created it need to be assigned to meshes.� You can assign materials by closing the material manager, selecting the group of meshes to assign the material to, then opening the material manager and press Assign (Figure 15).� The material will not show up on the mesh until you close the material editor.� The material needs to live under your models directory to be visible in MilkShape as described in the Importing and Materials section.
NOTE: You can remove MDK materials using the material editor, but the MilkShape counter part needs to be removed using MilkShape�s native material tools.
MDK Light Mapping
LOD meshes can be light mapped with unique light map textures and coordinates.� In order for a mesh to be light mapped, it needs to be assigned a material with a Meta material type of default_lit_lightmap, with the light map texture stage pointing to the material.
Light Map Meshes
MilkShape only allows one set of texture coordinates per vertex in a mesh.� To overcome this obstacle, you need to create a copy of the mesh, and name it following the naming convention set out below.� This new mesh is the Light Map Mesh.� The texture coordinates for this mesh are the ones used as the texture coordinates for the light map.� A Light Map material can be created to preview the light map on the light map mesh, following the naming convention below.
The light map texture coordinates for the LOD mesh can be set by using the native MilkShape UV mapping tools on the light map mesh.� Changing the light map mesh�s texture coordinates does not change the LOD mesh�s normal texture coordinates.� The light map materials are only used to preview the material on the light map mesh.� The light map material used in the game is the material of the light texture stage in the material assigned to the normal LOD mesh.
The light map meshes and light map materials are not exported and DO NOT need to be in the model manager.� Only the light map mesh�s texture coordinates are combined into the actual mesh it represents.
Naming Convention for Light Map Meshes and Light Map Materials
The Light Map mesh and the light map materials used to view the light map on that mesh must be named �@<mesh_name>� for meshes and �@<material_name>� for materials (Table 1).� This is how the importer and exporter now which light map mesh is linked to which LOD mesh.� If the name is more than 30 characters long, the �@� replaces the first character in the name.�
|
Mesh Name |
Light Map Mesh Name |
|
Model_LOD_0_metal |
@Model_LOD_0_metal |
|
catalina_LOD_1_fuselage_rt_wing |
@atalina_LOD_1_fuselage_rt_wing |
|
catalina_LOD_0_fuselage_tail |
@catalina_LOD_0_fuselage_tail |
|
Material Name |
Light Map Material Name |
|
dirt_dark |
@dirt_dark |
|
garage_struct_lt_window_cracked |
@arage_struct_lt_window_cracked |
Table 1: Example names for light map versions of meshes and materials
Importing Meshes With Light Map Coordinates
When the importer encounters a mesh that has light map coordinates, a duplicate light map mesh is automatically created in MilkShape (Figure 16).� The new light map mesh is named using the naming convention above (Table 1).� The material pointed to by the light map texture stage in the MDK material for the mesh is assigned as the diffuse material for the light map mesh (Figure 17).� This lets you view the light map on the mesh to make sure your light map texture coordinates are correct.

Figure 16: Light Map Meshes (@XXX) have been added for meshes with light map texture coordinates.
The texture coordinates of the light map mesh are taken from the light map texture coordinates in the file, and are used on export as the light map texture coordinates.� The light map mesh itself is not exported.� If you change the original mesh, then you need to delete the existing light map mesh, and create a duplicate of the initial mesh, naming it with the appropriate name.
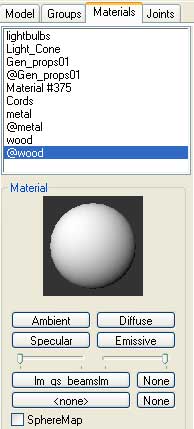
Figure 17: Light Map materials� ("@XXXX") which are assigned to light map meshes in the scene.
Exporting Meshes With Light Map Coordinates
On export, if a light map mesh exists for a LOD mesh, the light map texture coordinates will be taken from the light map mesh and set as the light map texture coordinates in the LOD mesh.� The Meta material type for the LOD mesh must be a Meta material type that contains a light map texture stage (e.g. default_lit_lightmap).
The light map mesh is found by pre-pending an �@� to the LOD mesh name, and finding that mesh in MilkShape.� If a light map mesh does not exist for the LOD mesh, then all of the light map texture coordinates will be same as the LOD mesh�s texture coordinates.� The light map texture coordinates for the meshes are used by the bsp_lightmapper in MOHRadiant in the light mapping process.
Light Map Materials
Light map materials are automatically generated in MilkShape
when LOD meshes with light map texture coordinates are present (Figure 17).� These
materials are for visualizing the light map mapping and do not play any role in
the light map process.� They are named
using the naming convention above so that you know which ones they are.�
MDK Exporter
The MDK Exporter is used to export MilkShape models as MOHPA game ready .MOH files.� These files can then be used just like any existing game assets.�� The exporter relies on MilkShape for the geometry of the object, and the model manager and material editor for the extended data and MDK materials respectively.� The Model Manager needs to be opened and then closed at least once before you can export.
The exporter is accessed through the File menu: File > Export > MDK Exporter (.MOH) (Figure 18).
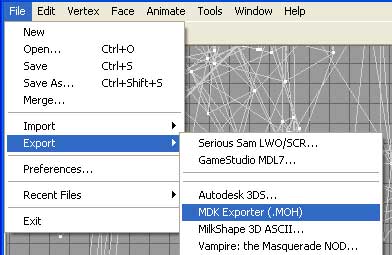
Figure 18: Accessing the MDK Exporter.
A successful export will result in game ready .MOH files, which can then be placed in a MOHPA level using MOHRadiant.� The new .MOH files need to be placed in a .Pk3 pack file in order to show up in the game.
Export Sanity Checks
The exporter runs a series of sanity checks to catch some of the common errors that could prevent the model from being able to be placed in the game.� If a check fails and there is an error, the model cannot be exported until that error is fixed.� Warnings can be ignored, but it is advisable to fix them.� The sanity checker dialog box displays the checks, whether they succeeded or failed, and whether the failure is a fatal error or just a warning (Figure 19).
|
|
|

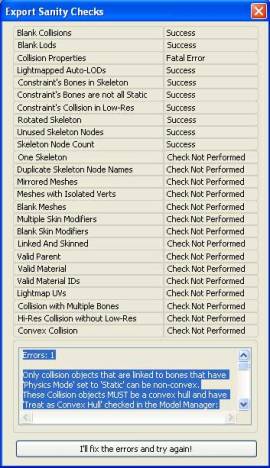
Figure 19: Export Sanity Checker without any errors (left) and with fatal errors (right).
A description of the errors and warnings, as well as the objects that caused them and possible solutions are displayed in a scrollable text box at the bottom of the dialog (Figure 20).

Figure 20: Warning and error descriptions and affected objects.
�
If a MilkShape material exists, and has been assigned to a mesh being exported and the material has not been converted to an MDK Material, the material will be automatically converted to an MDK material, with a default meta material.� This will lose any diffuse texture information in the MilkShape file.
The quickest way to test an export is to import your newly exported file in MilkShape.� Remember to save your current file and extended data before you import because the importer will clear the Model Manager and all existing MilkShape items.
Exporting Bones
It is advisable not to re-export existing models without re-skinning (assigning bone indices to vertices) the model (Figure 7).� If you create a new model with a new skeleton then you will have to re-skin it using only one bone index per vertex.� Animations are exported separately using the MDK Animation Sequencer.
MDK Animation
Sequencer
The MDK Animation Sequencer allows you to import existing animations into MilkShape and export modified or new animations from MilkShape which can then be set up to be used in MOHPA through HAG files.� The MDK Animation Sequencer is accessed by Tools > Mdk Animation Sequencer (Figure 21).

Figure 21: Accessing the MDK Animation Sequencer.
An animation file contains the key-frames for each bone in a skeleton.� There are no meshes, bones, or skeletons in the animation file.� The bones in the animation file are referenced by name so the skeleton they are to be imported onto needs to come from another file, with each bone named the same as the bones in the animation file.� MOHPA animations do not require any extended data, just a skeleton with key frames.� The key frames are set using MilkShape�s keyframe and animation utilities.
NOTE:� All animations are imported and exported at 30 frames per second (fps).
MDK Animation Importer
To import an existing animation, you need an existing skeleton in MilkShape to import the animations onto.� All character animations use the same skeletal rig (Figure 22), and character animations should be imported onto this skeleton.� Animations for other items, such as weapons, need to use the weapon�s skeleton.�
Skeletons are obtained by importing the model file of the object you want to make or load animations for, using the MDK Importer, not the MDK Animation Importer.� Once the model is imported, you can manually remove the mesh and save the skeleton out as an .ms3d file.� Saving the skeleton, as it�s own MilkShape .ms3d file will allow for convenient access for future animation imports or for creating new character animations.
The model file models/characters/allied/allied_tommy.gr2 contains a skeleton you can use as the skeletal rig.
To import animations, make sure there is a valid skeleton in the MilkShape scene, open the animation sequencer and click Import (Figure 23).� This brings up the same file dialog as the MDK Importer gives you (Figure 5), so you can load animations directly from .rez files, without having to unpack them first.� The selected file will be read in and the transform tracks for the bones referenced in the file will be added as keyframes for the bones in the MilkShape scene.
Once an animation is imported, it can be viewed and modified using MilkShape�s animation and keyframe tools.
NOTE:� If you are going to use a skeleton for exporting an animation, make sure that the Scale Bones button in the import files dialog is not checked when you import the model file that has the skeleton you want to use.
Skipping Frames
When you import animations, every time step in that animation is converted to a key frame, so you will have one keyframe per time step.� If you choose a value n, other than 1 (the default, one keyframe per time step) in the By Frame: (Figure 23) drop down, the animation will be evaluated every nth time step.� Skipping frames usually results in animations looking choppier than if every time step was sampled.
The From/To Frame: drop downs have no affect on importing animations, and are only used for exporting.
NOTE:� Importing an animation removes all meshes, materials, and extended data in the scene, so make sure the scene is saved before importing animations.
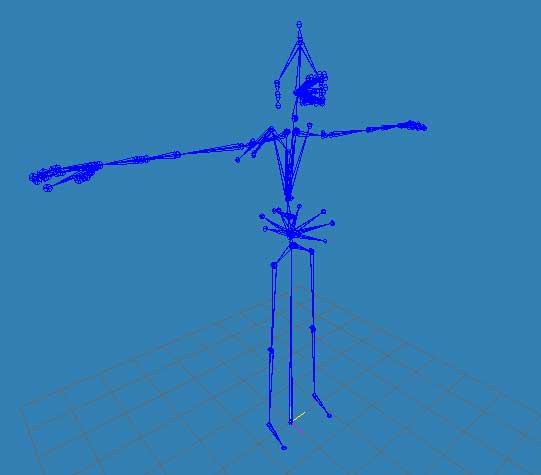
Figure 22: Character animation skeletal rig.
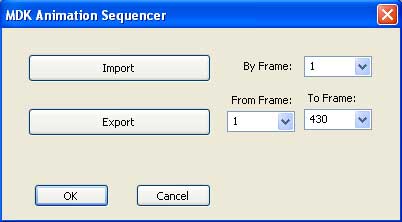
Figure 23: MDK Animation Sequencer.� The By Frame dropdown affects the animation import, and the From/To Frame drop downs affect the animation exporter.
Viewing Animations
Animations can be viewed in MilkShape by going into Animation Mode and using the frame slider bar and the playback tools (Figure 24).� The animation mode is entered and exited using the Keyframer window (Figure 24 and Figure 25).� When you import an item, the animation will not be visible until you enter animation mode.� As soon as you enter the animation mode, the currently activated viewport should display the first frame of the animation.

Figure 24: The MilkShape Animation tools.� The slider bar on the bottom right moves through frames manually, or you can use the play back button on the left.� To enter/exit animation mode, press the Anim button on the bottom right.

Figure 25: Accessing MilkShape's Keyframer tool bar.
Animation frames can be manually viewed by �scrubbing� the frame slider by dragging it left or right.� The animation will change in the currently activated viewport only, so other viewports need to be clicked in to see the current frame of the animation from that view.� The playback tools on the bottom right of the Keyframer can be used for automatic playback forwards or backwards, as well as to jump to first/last and previous/next frames.
Building Animations
Animations can be built using existing skeletons or new skeletons depending on the desired use.� To create an animation that can be used by existing characters or items, the existing skeleton for that object needs to be used.� New items and characters can have their own skeletal rig, but this will need to be set up in the HAG files for the item.
To build or modify animations use MilkShape�s keyframe animation tools.� MilkShape�s Animate menu provides the ability to add, remove, copy, and paste keyframes.� Keyframes are set on the currently selected joint(s) using the Animate menu, or by pressing Ctrl+k.� A keyframe will be added at the current frame in the frame slider bar for the selected joint(s).� Bones that have a keyframe at the present frame in the frame slider will show up as yellow.
�If a joint has not changed since the last frame, MilkShape will not add a key frame for the joint. You can change the number of frames in an animation, and therefore the duration of the animation, by changing the number field to the right of the frame slider.�
Character animations consist of rotating joints and moving the character_root bone.� If you change the position of the bone by translating it instead of rotating it, you may get undesired results in the game.� It is okay to translate bones for item animations.
Keyframes are interpolated, so you do not need a keyframe for every time step.� To get a smoother animation, you might want to add more keyframes for specific joints.� There are a ton of general character animation tutorials (not necessarily MOHPA specific) on the web.
Animations and skeletons do not require any extended data so they can be saved as .ms3d files until you are ready to export them to the game.
MDK Animation Exporter
Once you are finished or want to test an animation in the game, you need to export it use using the Animation Sequencer�s Export (Figure 23).� The resulting animation is stored in a .MOH file, and can be imported and used like any existing animation file.� Open the animation Sequencer and press Export.� All that is required to export an animation is a skeleton in the scene.� One or more keyframes need to be set for joints that you want to move in the animation.�
The animation exporter creates an animation by linearly interpolating bone position and rotations between keyframes for the duration of the animation.� Using the From/To Frame dropdowns (Figure 23) you can export a subset of the animation.� The default frame selections will export the whole animation.
Existing models are already skinned so you can just re-export using an existing skeleton and it should play on the existing models without significant visual discrepancies.� The animation has no ability to alter the skinning of an object.� New items will need to have their own skeletons, and the model files that use these items will have to be skinned appropriately (Figure 7).
NOTE: There can only be one skeleton in the scene at export time, meaning all bones have to be in some sort of hierarchy with a single root bone.�
Playing Animations in MOHPA
Once an animation is exported, it can be viewed in the game by setting up .HAG files appropriately.� All animations for characters are referenced by an alias based on what state the character is in.� To override the default values, you need to change the files that the aliases point to in the appropriate .HAG file and store that file in a .Pk3 file with your other models.� Overriding animations is a little tricky, and this document will not go into depth about it.
Existing character animation .HAG files can be found in models\characters\player\base.� There are many different .HAG files for the different states the character can be in named anim_xxx.hag.� The unarmed animations can be found in anims_unarmed.hag.� Just replace the existing <filename>.gr2 filename with your animation file name <great_animation>.moh.� The following (Figure 26) shows how you would change anims_unarmed.hag file to make the standing idle to play your animation.
mupxl_Prone_Left� mupxl_Prone_Left.gr2 loop autosteps_walk
mupxr_Prone_Right
mupxr_Prone_Right.gr2 loop autosteps_walk
musxi_Stand_Idle
<your_idle_anim.moh> loop
musxf_Stand_Walk_Forward
musxf_Stand_Walk_Forward.gr2 loop autosteps_walk����������
Figure 26: Replacing the existing standing idle with a new animation.
The name on the far left is the alias, followed by the name of your animation, followed by whether you want the animation to loop and the optional values that follow the loop flag.� Each entry needs to be on its own line.� See the files for examples.
The alias use to call the animation is defined in the state (.st) file for the character (player_Torso.st and player_legs.st).� The state files can be found in the global\ directory, a sibling directory to the models\ directory.� If you override any of the state or hag files, they need to reside in the same directory structure in your .Pk3 file.
To view character animations in MOHPA, override the appropriate animation in the .HAG file, and store this new .HAG file in the .Pk3 file.� When you run the game, if you are not playing multiplayer, you can use a cvar to change the camera into a 3rd person leash camera: cg_3rd_person 1.
Conclusion
With the MDK MilkShape 3D tools, users can create or modify content for MOHPA, allowing for complete or partial Mod re-skinning so the game.� The exported files can be used like any other pre-existing game asset.
�The MDK Importer is used to bring existing models into MilkShape to be modified and re-exported.� The MDK Model Manager is used to modify the model�s properties as well as save the extended data separate from the MilkShape file.� The MDK Material Editor is used to create and modify materials used in the game.� The properties for the materials are saved in the extended data section in the model manger.� The MDK Animation Sequencer is used to import and export animation files.� The MDK Exporter allows you to export your new or modified asset from MilkShape 3D.� See Figure 27 for a diagram of the typical workflow for getting an asset into MOHPA.
Appendix
A: Tutorials
Creating and
Exporting Models From Scratch
- Create the mesh and bones in MilkShape.�
- Every vertex in the scene needs to be attached to a bone.� A bone in MilkShape is a �Joint�.� Typically you can assign all vertices to a single root bone.�
- Create materials in the Material Manager.� If you are going to texture the model, you need to create a new MDK material in the material editor and assign it to the model (see section: New and Converted MDK Materials).
- Add the meshes to the renderable section of the Model Manager.� The meshes you want exported will need to be added to the collision or LOD section accordingly (see section: Interacting with the Model Manager).
- Add visible mesh(es) under the LOD0 (or LOD1, LOD2, �) section of the Model Manager.� Add a mesh to a LOD by first selecting the meshes you want to add to the LOD, and then opening the Model Manager.� Once the Model Manager is opened, right-click on the desired LOD level and choose Add Selection To Lod.�
- Add collidable mesh(es) under the Collision (Low-Res) section of the Model Manager.� With the Model Manager closed, select the meshes you want to add as collision, and then open the Model Manager.� Once the Model Manager is opened, right-click Collision (Low-Res) and choose Add Selection To Collision.�
- The newly added mesh(es) will show up in the model tree view (MTV) pane.
- Add the bones to the Skeleton section of the Model Manager.
- With the Model Manager closed, select the bones (joints) you want added.
- Close the Model Manager and run the Exporter.
- Fix any fatal errors and review any warnings in the Sanity Checker.
- Click Continue Export.
- Place your fabulous new asset in MOHRadiant, and in a .Pk3 file.
- Run the game with your mod enabled and enjoy.
MDK
MilkShape 3D Workflow:

Figure 27: Workflow for creating or modifying assets from the game.