Getting Started with the
Medal of Honor Pacific Assault
Mod Developer�s Kit (v1.1)
����� The Medal of Honor Pacific Assault Mod Developer�s Kit (MDK) includes a suite of tools to help the mod developer create mods for the game. The starting point for your mod creation is the MDK Launcher application. When the MDK is installed, a shortcut to the Launcher is placed on the desktop and in the start menu. When you start the Launcher the following screen appears:
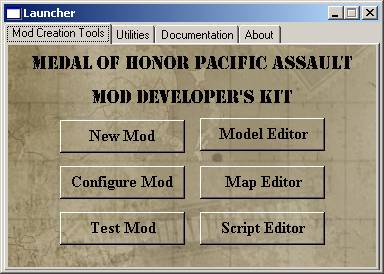
����� The Launcher buttons correspond to the steps you will take to create a valid mod for the game. Conceptually, the steps are as follows:
- Create a mod directory and the necessary files and folders for a valid mod.
- Create and edit the 3D models
- Assemble the map
- Create any other assets for the game, such as scripts or sounds.
- Package the mod assets into pak files.
- Enable the mod in the game.
The MDK assists in these steps with the following tools that can be started from the Launcher:
- New Mod - Launches the Mod Wizard which will take you through the process of creating a mod directory and initializing a mod description file (moddesc.xml). Folders will be created in the mod directory to hold the assets you will be modifying. For example, there is a �models� folder which will contain the 3D models your mod will use.
- Model Editor � The model editor button starts the MDK supported 3D model editor. MilkShape3D is the editor supported by the MDK. Using the MDK MilkShape plug-ins, you will be able to create and modify 3D models that are used in the game with this tool.
- Map Editor � This button launches the MDK supported map editor, which is Mohradiant. Mohradiant is a version of Radiant that has been modified to create maps that can be used with Medal of Honor Pacific Assault. Mohradiant will be used primarily for assembling maps and creating terrain. Mohradiant is not Radiant - some of the brush creating capabilities have been disabled, since model building should be done in the model editor. Models from your mod model directory and from the game assets can be used to create new game levels. This version of Mohradiant also includes a terrain generating program for creating new map terrain. It also has a light map generating feature for automatically creating lightmaps for the level.
- Script Editor � The script editor is a simple text editor which can be used for viewing game scripts and hag files, making simple changes, and saving them to your mod directory. The Script Editor reads directly out of the .rez files, so you don�t need to unpack the game data to edit scripts.
- Configure Mod � The mod
configuration utility can be used to enable a mod so that the game will
recognize it. It can also be used for adding pak files and modifying the
information about the mod. It is important to note that mods can not be
used by the game without enabling them first. There are two places you can
do this. One is the Configure Mod utility, the other is in the game using
the Mod Browser, which is located in the multiplayer menu.
- Test Mod � The Test Mod button
will bring up a dialog that can be used for running the game with your
mod.
The second tab of the Launcher contains some important utilities:

1. The Pak File Utility button will bring up an application for packaging your mod�s assets into pak (.pk3) files. The pak file utility the MDK uses is the familiar PakScape program. When the mod wizard runs, it sets up asset folders in your mod directory. Mod directories will always be in:
MyDocuments\EA Games\Medal of Honor Pacific Assault(tm)\moddir\modname
Where �modname� �is the ID you gave your mod when you ran the wizard. Pak files should be created in this folder and given the name �pakn.pk3� where n is a number greater than the current pakfiles used by the game. Game pak files are located in �Program Files\EA Games\Medal of Honor Pacific Assault(tm)\main� and �Program Files\EA Games\Medal of Honor Pacific Assault(tm)\mainmp�.� Instead of using .pk3 format, they use .rez format. You can still override data in a .rez file with a .pak file. For example, if the highest rez file in those directories is pak8.rez, you should name your pak file pak9.pk3 or greater. This will ensure that any assets you create with the same name as those stored in the game pak files will be used instead of the game assets. By creating your pak files inside the mod directory, the assets will automatically have the correct paths since the game will look for models in the �models� directory, and maps in the �maps� directory, etc.
You may find it necessary to see what is in a game .rez file. Rez files can be opened with the MakePack utility, located in the MDK/bin folder. To get a list of all the files in a pack file run the following command line: �MakePack �m filename.rez�. To extract a specific file type �MakePack �x� filename.rez file, where file is the name of the file to be extracted. To extract all of the files in a .rez file just type �MakePack filename.rez.
2. The Rez File Utility is used for extracting individual or the entire .rez file. All of the MDK tools are capable of reading directly from the .rez files so you shouldn�t need to use this tool too often. You probably want to avoid extracting all of the .rez file contents since they take up lots of disk space.
3. The Decal Tool is used for creating your own decal materials. See the art section of the Users Guide for details.
4. The Texture Utility button will launch the DirectX 9 texture tool. This tool can be used for creating .dds files used by the game. It will convert other texture formats like .tga into DirectX compressed textures. The compressed texture formats used by the game are listed in the tool as �Four CC 8-bit: DXT3� and �Four CC 8-bit DXT5�. Compressed textures allow you to use higher resolution textures without a performance penalty. See Microsoft�s Direct X documentation for details.
Mod Configuration Utility
����������� The Mod Configuration utility is an important part of mod creation, and may need some further explanation the first time you use it. When the Mod Configure utility is launched the first screen is as follows:

����������� On the right, is a list of Mods that currently exist. They correspond to the mods stored in �MyDocuments\EA Games\Medal of Honor Pacific Assault(tm)\moddir�. Mods that have a check mark next to them are enabled. That is, they will be used by the game. Mods that are not enabled, will be ignored by the game. If more than one mod is enabled and they conflict, the one with the highest priority will be used.� Below the list of mods is the �Current Mod� name. The current mod is used by the MDK tools to determine which mod to save and load files from. Click on the �Set Current Mod� button to select the current mod from a list. To enable a mod, select one in the mod list, then click on the Enable button:

The EnableMod dialog will enable the mod, and allow you to set a priority for the mod. If you set a priority that is already used by another mod, that mod�s priority will increase by one. If that mod�s priority is also in use, it will increase the other mod�s priority that is in use and so on. This insures that no two mods will ever have the same priority. If you click the Downloadable box, servers will make this mod available for download directly from the server. The EnableMod dialog can be used for examining the current state of the mod without making changes by clicking the cancel button when you�re done. The Disable button, as expected, simply disables the selected mod in the list. Note that clicking on the check boxes in the Mod List have the same effect as clicking on the Enable and Disable buttons.
����������� The Add/Remove Pak Files button is another necessary feature that you need to use to make your mod usable by the game. When you click on the button it will bring up the following dialog:

A list of available pak files (which you created earlier with the pak file utility) are listed. You can select multiple pak files if needed. Select a pak file and click on �Client� if you want it to be downloaded by the server, or �Server� if it�s a server-only pak file and you don�t want it to be downloaded by the server.Click OK to add the checked pak files to the mod. Note: By not checking a pak file, you will be excluding it from the mod.
The �Properties� button on the Mod Configuration utility brings up the mod information for editing:

Most of the information presented in the Mod Properties Dialog was created when you ran the Mod Wizard. This dialog gives you the chance to change any of the information after you�ve already created the mod. One thing that can�t be changed is the mod ID. The mod ID is the name used to identify the mod and is also the name of the mod�s folder. Note that the mod name is intended to be more descriptive, but not used by the game or the tools for identifying the mod. New to version 1.1 of the MDK is the �Mod Sharing� section. Mod sharing is covered in more detail in the Mod Collaboration section of the User Guide. If you�re just getting started, and you don�t care about mod sharing, you can leave the default values for now.
Testing Your Mod
����������� Once the mod has been enabled, it will be used in the game when a map that contains a modified asset is used. Often times the map itself is a modified asset. You can create a shortcut to the game and use the �+map mapname� command line, but an easier way is to use the Test Mod button from the Launcher:
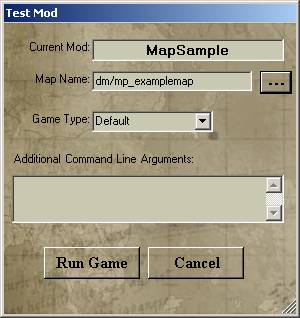
The first field of the Test Mod dialog is the Current Mod. As described earlier the Current Mod is the mod ID of the mod you are currently working on. If you want to test another mod, click on the cancel button and go to the �Configure Mod� dialog and select a different mod. In the �Map Name� field click on the ��� button to bring up a list of available maps. The list will contain maps that exist in the game, as well as maps you have created for this mod. Map names are relative to the mod�s maps folder. For example if the map is in �maps\dm\mp_shootingrange.bsp�, the map name in the list will be: �dm\mp_shootingrange�. If you prefer, you can also type in the name of the map (without the .bsp extension). Pull down the Game Type combo box to get a list of possible game types to run the mod with. Finally, you can add whatever command line arguments you want in the �Additional Command Line Aguments� field. All of the information will be saved for the next time you click on the �Test Mod� button, so you won�t have to re-type it. Click on the �Run Game� button to launch MOHPA.
����������������������� This concludes the introduction to creating mods with the MDK. You now know the mechanics of creating a valid mod that can be used in the game and by the tools. What remains is the actual content creation. If you�ve created mods for other games, content creation should already be familiar to you. You can read the MDK documents for the type of mod you want to create to find out the specifics for this game.