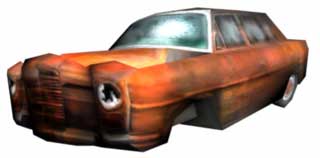
Setting up and Manipulating Explosions and Sequences
AKA. BLOWING STUFF UP GOOD!!!!!

By Steve Mumford
-Thanks to Etienne Rheaume for helping with the test map that’s included.
In this tutorial, I will cover:
Creating a Destructible Object
Planting Sprite FX Entities
Creating a Sequencer
Planting More Sprite FX Entities
Conclusion
You should already have a basic knowledge of Goedit before diving into this tutorial.
NOTE: When making or placing destructible objects in your maps, remember that there are limits. I wish there weren’t, but there are. 8 Destroyable cars scattered throughout a fairly large map is plenty. Unfortunately, you have to think speed before coolness. If coolness came first I’m sure we would have made maps with 108029 cars and nuclear bombs exploding in your face. With a framerate of 0.00001 and things like muzzle flashes and grenade explosions no longer showing up as a result, the coolness wouldn’t last. By all means, don’t refrain from making your levels cool, but be reasonable when throwing effects into your levels.
If you have suggestions or comments, email me at steve@barking-dog.com
But please no questions; use the forums!
1. CREATING A DESTRUCTIBLE OBJECT:
Find a place in your map where you want to begin putting this baby together. I suggest a nice empty place.
Orient the green crosshair to where you’ve chosen to begin (by putting your cursor over that area and pressing the X key).
Place a DestructibleModel Entity by clicking on the Classes Tab and double clicking on DestructibleModel.
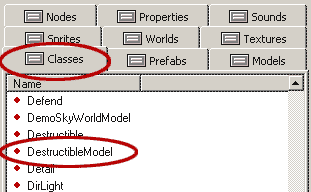
Click on the Properties Tab and you will see the properties for the newly placed Entity.
**I go into a bit more detail below the image**
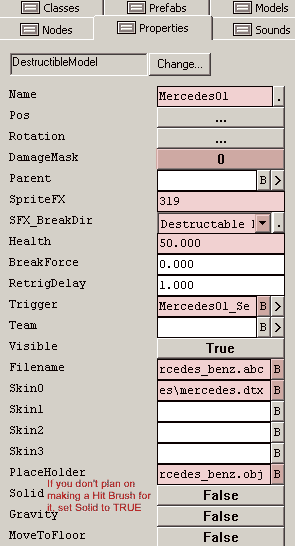
Name: Make sure you name the file something you can remember.
Rotation: Controls which way the model is facing, etc… We will get into this a little later.
DamageMask: This is what types of damage will affect the DestructibleModel. Click on the 0 button to bring up a window where you can select what you want and don’t want affecting you model.

In this case everything is turned to True except C4_Bomb. C4_Bomb is the BIG bomb that is used in levels like USA and Mexico. Timed C4, Remote C4, and LAW blasts belong to DM_Grenade!! LAWBackwash damage is created by the smoke and fire that comes out of the back of the LAW when it is fired. For the Turbines in USA, everything would be set to False, except the DM_C4Bomb, so nothing other than the big objective bomb will blow them up.
SpriteFX: when the car blows up a SpriteFX model of a destroyed car replaces it. In this case, the destroyed version of the car is SpriteFX 319.
SFX_BreakDir: Setting this to “Destructible Direction” will give the destroyed, SpriteFX car the same Rotation attributes that were given to the DestructibleModel version of the car.
Health: This is how much damage the model can take before it finally blows up. Generally, a setting of 50 will require 1 Frag Grenade to destroy it, or 3 – 4 bullets.
Trigger: A DestructibleModel has the ability to trigger 1 thing. For a car explosion we will need to trigger a lot more than just one thing, so we will be using a Sequencer to control it all. We will get back to this further into the tutorial.
Filename: Specify where the .ABC file for the car is located. This is the good version that will show up in your level before being blown up. (Models\vehicles\mercedes_benz.abc)
Skin0: This is the texture that will be applied to the model. (Skins\vehicles\mercedes.dtx)
Placeholder: This is an .OBJ version of your model that will allow you to see the model in Goedit, so you can rotate and place it properly. (Models\vehicles\mercedes_benz.obj)
Solid: Should be set to FALSE. If you set it to true, the car will be solid until it blows up. The blown up version of the car is a SpriteFX and cannot have collision set on it, so you will need to create a Model Collision Box to deal with the collision. (Refer to Explodables and Model Collision Box Setup in e_T’s Funky Tutorial Vol. 1)
Rotation. Now that you can see your car, make sure it is facing the direction you want it to face by click on the … button to the right of Rotation in the Properties Tab.
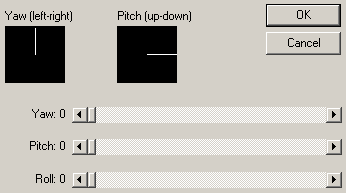
By dragging the Yaw slider, you can change the direction of the car. Most destructibles in the game should be on a flat surface, so use Pitch and Roll sparingly.
TEST
Compile your level and test your car out. When working with entities, like you are now. You only need to do an entity compile to test your car. For an entity compile, no boxes need to be checked.

Select the World > Process Menu to bring up the compile window.
Then to run the level, select World > Run.
Try dropping a grenade or two near the car. Does it swap textures and animate? The nose of the car should lift off, and then slam back into the ground. If this happened you have successfully made a destructible object. Now to make it look cool…
2. PLANTING SPRITE-FX ENTITIES:
SpriteFX in this explosion will range from fire, to tires, and will make the explosion a bit more dramatic and fun to watch.
Place your green crosshair just outside of the front-left wheel on the car. Make sure the crosshair is aligned in all viewplanes (it might look aligned from the top, but it might be way too high or low if you look at it from the side).
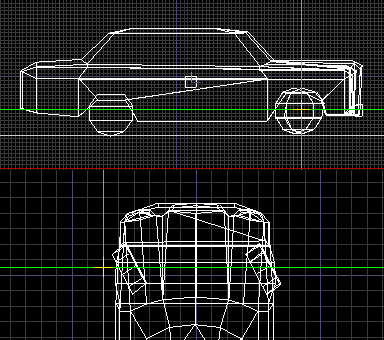
In the Classes Tab, double click on SpriteFX. This will create a blank SpriteFX entity, which will emit a wheel when the car blows up. If it isn’t quite in the right place, you can use your arrow keys on your keyboard to move it around. It will move based on the scale of your grid. If it’s moving too much, or taking too long because the grid is too small, you can use the + and – keys on the far right of your keyboard to adjust the size of the grid.
Click on the Properties Tab to bring up the properties for the SpriteFX entity you placed.
Name: Name it something, like “tireLeft”.
Rotation: This is very important; since it will set what direction the wheel will be emitted. Set the Yaw to what direction the wheel should be emitted, if you where looking at it from above. Set the Pitch to the angle at which you want the wheel to be emitted. Setting it to something around 54 will make the wheel shoot down and away, bouncing off the ground.
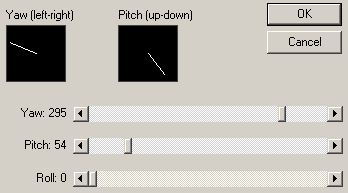
SpriteFXID: Input the SpriteFX number that you want to call. I this case the tire for the car is SpriteFX 321. (There is a detailed list of SpriteFX and their corresponding numbers at the end of this tutorial).
Perpetual: Set this to False. If you want something to start emitting when the level is started, you would set it to True. In the case of the car, you don’t want the tire to emit until the car blows up, so you set it to FALSE.
Now copy this entity (Ctrl+C), and then move your green crosshair to just outside the front-right wheel and paste it (Ctrl+V). With this particular car, the two front wheels will disappear when it explodes, so these two entities you have placed will spawn two dynamic wheels that will appear to have been blown off of the car when it exploded. They will already have velocity and other dynamic attributes set on them, so you don’t have to worry about that.
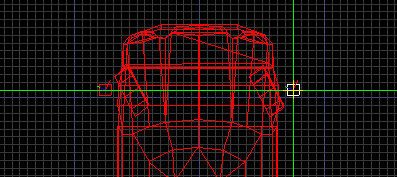
Name it. Something like “tireRight”, and change the rotation so that the Yaw is facing the other way (Away from the car).
Now you have two tire emitters. There are more SpriteFX emitters to be planted, but first we are going to get these two working by creating a Sequencer.
CREATING A SEQUENCER
A Sequencer ties everything together, and is basically the same as the Trigger in the DestructibleModel properties, but it has the ability to trigger a lot more than the DestructibleModel can.
Place your green crosshair somewhere near the car. I usually place my Sequencers just off the front-side of the model. It doesn’t really matter where you put it, as long as it’s easy to click on and easy to remember.
Click on the Classes Tab and double click on Sequencer. Now a new Sequencer entity should have appeared where your green crosshairs are.
Click on the Properties Tab for the Sequencer. You’ll see 10 Time slots and 10 Target slots. Time 1 and Target 1 go together, Time 2 and Target 2 go together, etc… The time slots cause the corresponding effect to have a delay before spawning. This can come in useful, but for the tires, it’s best to leave them at 0 since the tires emit right when the car blows up.
Name your Sequencer.
Click on the B button that belongs to Target 3 (I always like to leave Target 1 and 2 open, just in case I need to call another Sequencer or Event in the game somewhere further down the line.
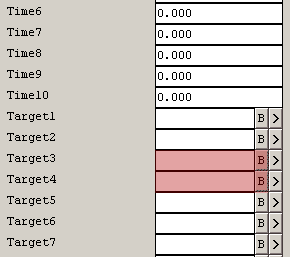
When you click on the B button, a window will come up where you can select something to Sequence. In this case it will be the two Tire SpriteFX that we did.
An ObjectBrowser window will pop up. Click on the + next to the SpriteFX name and select tireLeft or whatever you called it. Click OK.
Click the B button for Target 4 and follow the same steps, but this time select tireRight.
Now you have a functional Sequencer, BUT, you still need to trigger it when the car blows up, or nothing will happen. So…
Select the DestructibleModel entity that belongs to the car.
Click on the Properties Tab.
Click on the B button that belongs to Trigger.
In the ObjectBrowser, click on the + that belongs to Sequencer and select the Sequencer you created for the car. Hit OK.
Try it out!
Make sure you do an entity compile before running the level, or you will see no changes.
Now, when you blow the car up, two wheels should get blown off of the front.
3. ADDING MORE STUFF
Now that you have a grasp of creating SpriteFX entities and adding them to the Sequencer, try adding a hood that flies of the front of the car when it blows up.
The hood SpriteFX ID for this car is 322 (Make sure you point it up and away from the car).
Other effects that I gave to the car blowing up were:
Hood explosion: SFX ID 272
Big explosion under car: SFX ID 184
Engine Fire: SFX ID 245
Damage Radius**
Speaker**
** Damage Radius’ cause damage to players and surrounding destructible objects and also cause camera shake. Speakers play a sound that corresponds with the explosion. These can be planted as entities and added to the Sequencer just like the tire SpriteFX you did.
NOTE: If you are interested in adding additional FX, a Damage Radius, and a Speaker, you can refer to the carBOOM.ed file that was included with this tutorial. Now that you have a good idea of what DestructibleModels, SpriteFX and Sequencers are, you should be able pick apart the example car quite easily and figure out how to make yours just like it. Or BETTER!!
If you come across problems, remember, more times than not, it is because of the most simple reasons, like forgetting to compile, or forgetting to click one button. Hopefully you won’t come across any problems at all.
If you want more destructible objects to play with, or want to know SpriteFX ID’s of things you can emit from your explosions. Check out Destruclible_Emporium.ed that goes along with e_T’s Funky Tutorial Vol. 1