V.1.0 2002-03-27
Made available online by Shadowphreak
Global-Op World – Global Operations Editing
http://go.erwination.com
Before you start your Masterpiece 2
Game Types and Mission Objectives 16
DEV Function Key Descriptions 22
Welcome to the world of Global Operations (GO) world creation. GO uses the Lithtech Talon engine (a modified version of Lithtech 2.4). The tool used to create GO worlds is a modified version of the Lithtech editor DEdit, that we call GOEdit. If you have created maps for other first person shooters then you should have little difficulty learning GOEdit. If you are new to the world of map creation then you have some work ahead of you but with dedication and practise you will be creating worlds in no time.
The following document is a starter guide that will help you get up and running. This guide is intended to get you up and running and introduce you to the basics of world creation including BSP construction, VIS groups, lighting, entities and much more. Good luck and we can’t wait to see what you come up with.
GOEdit being a modified version of DEdit, shares a lot of functionality. Check out the DEdit documentation for further reference.
Designing levels takes a lot of work. Understanding the concepts that allow strong gameplay to flourish while sticking to very rigid limitations can be very intimidating. Here are a few tips that may help you get a solid start on the path to making successful worlds.
Make lots of bad levels. Nobody gets it right the first time. That old saying, “If at first you don’t succeed try try again”, really applies here. When developing a level it is often better to try many things and start fresh then it is to expect to get it right the first time. This leads to the second point.
Let as many people as you can see your levels. The more eyes on your work the more feedback you will receive. Don’t be afraid to show people your levels and be willing to truly listen to what they say about them. It is often hard to work for months on a level and hear a bunch of complaints. Feedback is often negative because people don’t feel a need to comment on what is working well. If you are open to honest feedback and you aren’t afraid to be open to modifying your ideas that aren’t working for other people then you are on your way to making a much tighter level. This ties in nicely with the third point.
Playtest your levels extensively before you release them. Try and find a group of gamers that will help you test your ideas. This can be a group of friends or a clan you are a part of. The point is that you cannot find out all the things that will go right or wrong with your level if you are only testing with a small number of people or by yourself. These tests groups are also crucial to helping you decide how many players to suggest for your levels.
Plan out your designs on paper to focus your designs. It is tempting to start on a new level with the editor loaded up and no clear plan. It is much easier to finish a level if you know what you were aiming for. With no plan before you start you can end up wasting most of your time trying to find your focus.
Keep organised while you build. Make a neat and orderly list of nodes that are well named.
Finish your levels. It is easy to come up with concepts for a level. It is also easy to start building a level. One of the most difficult parts of working on levels is finishing. Try to finish a level before moving on to that next idea. It is useful to work on many levels but finishing a level takes that extra bit of work that gives you the chance to feel a sense of completion. Finishing is hard work but it pays off in a big way.
Use the resources that you have available to you. If you are good with textures then plan on making some custom textures for your levels. If you have a game concept make sure GO has the ability to do what you have in mind. It is much easier to use the built in textures and stick to pre-established rule sets than it is to come up with 100% new stuff on your own. By all means try new things but think about your resources before you start building your masterpiece and it will be a lot easier to reach your goals.
Have fun. There are limitless ideas out there for missions. Have a fun time building levels and don’t expect things to happen overnight. Take your time and explore what you can do.
When you are working with GO you are working with what is called a Binary Space Partitioning tree… or BSP for short. A BSP tree allows areas of the level that are not currently visible, and therefore do not need to be drawn, to not be drawn. This speeds up levels a great deal. With any BSP engine there are certain considerations you must make with your designs if you want to have optimal performance in your levels. You have to be careful to minimise the amount areas in your level that look into other areas. For blocking fairly detailed areas from other areas it is often necessary to use what is commonly referred to as an S-Curve to make sure the areas are guaranteed not to see each other. Building with a BSP tree in mind will come with experimentation and experience.
There are many other little rules you will need to know when designing a BSP world.
There are many other little rules you will need to know when designing a BSP world. Here are some of the basic rules that apply to GO.
Polycount Limitations – It is important to know that you cannot render all the polygons in the world and still expect a multiplayer level to perform well. The maximum polygon count in a given view for GO should always remain below a maximum of around 800 polygons. This should not be considered the average number of polygons you are shooting for. Ideally try to keep your poly counts as low as possible in every area of your map but an average of 400 polygons at any given time should be ideal.
Model Poly Counts – GO is a multiplayer game and as such you should keep this around 3-4000 MAXIMUM. This counts the view model of your current weapon, and any visible prop, gun or player. Like world polies, the lower the model polies are, the faster the world will run.
Visible Leaves – You should keep this to 600 or less, sadly large areas connecting to other large area without major Visibility blockage such as a path through a building will add to visible leaves. Once again going above 700-800 may have an impact on framerate.
Num Clip Tests –This is the number of times polygon-plane clipping occurs each frame. Larger numbers of polygons e.g. partially off-screen will induce a larger value for numcliptest. It is best to keep this number below 5000 in a typical world.
Texture Counts - For a public release should be about 22 megs for just the world, that won’t include player skins and props. The trick is to use optimised textures and reuse textures in imaginative ways. The best way to optimise new textures is to keep them small, a 256x256 cinder block wall texture might have dozens of block but unless it is painted with a pattern or has damage/water leeching on it, you only really need one block to tile. This may not work in some cases or look wrong but its important to texture smartly
The first thing you need to do is unzip GOEdit to a directory on your machine. This can be placed anywhere you like but it is a good idea to keep it near Global Operations for convenience. We suggest creating a sub-directory of GO called Tools (Crave\Global Operations\Tools). You will have to copy the file MSS32.DLL to the directory you place the tools. This file can be found in the Global Operations directory where you installed the game.
Once this has been done you can run the editor. Once you have the editor running you need to load a project file. The project file is a file that tells the editor what project you are using and where to look for all the resources like sounds, textures and models. To open this file go to the menu and select /File/Open Project. Look for this file:
Once the project file is loaded you are ready to start making levels but this is a good time to take a few minutes and customise the configuration of the editor.
Go to the menu and open Edit/Options:
The Display tab is used to change the visual look of the editor and its windows. Here you can modify your colour schemes and set a few other options. It is important to note that you can modify these settings to whatever level you find useful and that no one set of settings is the correct way. We are suggesting what worked for us.
Handle and vertex size allows you to adjust the size of the lines drawn for handles and vertexes. You might want to adjust your handle or vertex size depending on your colour scheme and screen resolution. If you want to make the lines show up more then increase these values.
The Direct3D tab lets you choose to use hardware acceleration. If your video card supports it then you should select the Use Direct3D box. This will give you hardware performance in the your 3D perspective view. You can experiment with selecting the Include 2D Views button as well although there have been some known issues with graphic errors if you accelerate the 2D displays. It is a good idea to select Z-Buffer Lines and Vertices. This will sort all the lines and vertices in the editor. Device should be set to your best video device available and Mode works best set to Hardware Acceleration.
Note: There is a bug currently when you go full screen in a 2d viewport (Shift-Z with mouse over desired viewport), where upon returning to 4 window layout, the 3d viewport will revert to software rendering, simply right click in the 3d port and go Direct 3D options/Use direct3D
The Run tab is where you set the editor up to with the installed version of the game. Executable should point at the development engine executable. This file should be located in the /Crave/Global Operations directory and is called dev.exe. Working directory should be set to the Global Operations directory (eg. c:\program files\Crave\Global Operations). For Program arguments you should have at least “+runworld %WorldName%”. This will allow you to run a compiled level from the editor.
Under the Clipboard tab make sure Generate unique names for pasted objects and Update referencing properties are checked.
The General tab lets you change some other options. Invert Mouse Y allows you to invert the vertical movement of your mouse in the perspective view. Selecting Release Bandbox Selection allows you to use the mouse to select objects in the editor by holding the left mouse button and dragging out a box. Without this option selected you will have to point and click on each object to select it. Selecting Uniform grid locks the grid size for all of the views. checked as well, that keeps the grid size the same in all viewports.
At the bottom of the General options tab is the Autosave feature. This feature works but can take up a great deal of hard drive space and can hit the HD a lot if you set a large number of backups or a short interval time.
Go to the menu and open Edit/Key Configuration:
This is very useful as a reference for which keys are bound for editing but unfortunately there is a bug with the current version of the editor and you may get crashes if you change your key configurations from the default.
Go into /view and make sure Main, Nodeview and Worldedit toolbars are checked, that lets you access the most important stuff without digging into menus or shortcuts.
Now you should have these new tool bars. Grab the double like pattern on the left side of them to drag them to better places.
Before you start, make sure you select the folder you would like your map to reside, by highlighting the folder name in the worlds tab in the project window.
Once you have done that, go to File/New world and name you world, once you
Click OK, it will open and you will be presented with a 4-window configuration.
When creating geometry, it’s important to keep an eye on the sizes of geometry, while you are creating or editing a brush, you can see its dimensions at the bottom right of the editor here, like this:
![]()
Go to Mode/Brush creation mode; make sure your grid size is set to 64, in the top view, click and drag until you have made a box that is 512x512 units
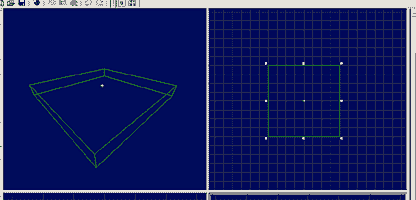
Now hit ENTER, and it will create a solid, un-textured piece of geometry (Until you hit ENTER or ESC you will not be able to do anything else). Now we have a floor, in order to create walls, were going to use a common procedure called cloning, instead of creating a brush from scratch like we just did.
To clone a brush, make sure it is selected, then hold down the shift key, click and drag the brush away from its original location and let go of the mouse button (Always let go of shift key AFTER you release the mouse key, otherwise it will not clone it). In this case, drag and clone the brush in the top view, like this:
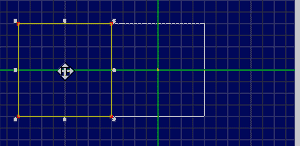
Now you have two floor brushes side by side, were going to turn that new floor brush into a wall by scaling it left to right at first, then up and down. So grab the scaling handle on the far left side of the brush you just cloned and scale it down to 64 wide:
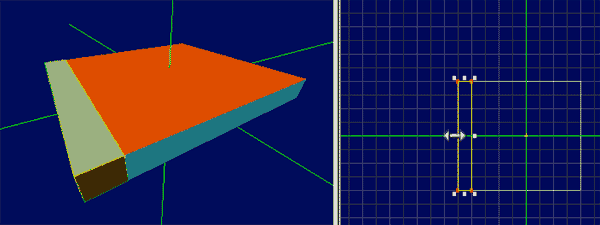
Now the brush is the right thickness, but we have to scale it up so it’s high enough to create a wall, go into your FRONT view (Bottom right of editor), grab the scaling handle on the top edge and drag up until you see it has been scaled to 512 high (remember you can see this change at the bottom right of the editor):
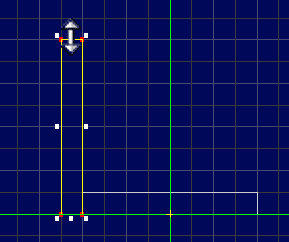
Now for the sake of simplicity, were going to drag and clone this brush to the right side of the floor, do this in the top or front view port:
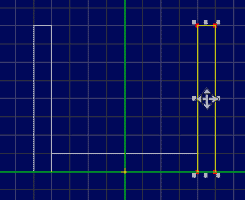
Now we have a partial room, lets clone over the other walls, in the top view, grab and clone the wall you just made and put it at the top end of the source brush, like this:
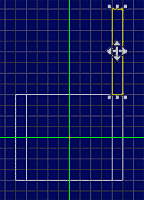
Now were are going to use the corner scaling handles, which allow you to scale a brush in two different axis at once, in the top view, grab the top left handle and drag it like this:
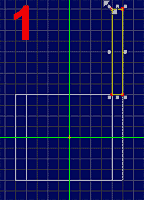
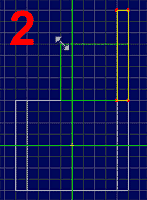
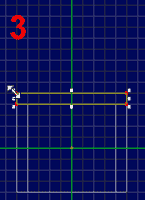
Now were going to clone this wall to the other side, in the top view shift-click drag the brush you just made to the bottom:
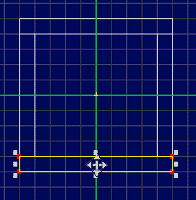
And the 3d view should look like this:
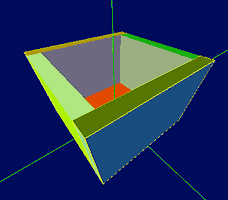
So as you can see, we have a nice little box, minus the ceiling, so lets complete the puzzle by cloning the floor, in either the Right or Front view, select the floor brush and clone drag it to the top of our brush group, thereby sealing the room in:
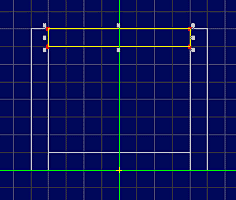
Now if you fly the camera into the center, you will see a closed room, un-textured of course, so lets add some textures, open the Textures tab in the Project Window:
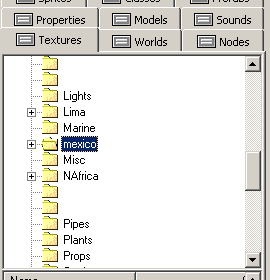
Scroll down and find Wall_bar_03, select it, then highlight one of the walls (Or all of them by holding down the Control key while selecting) and hit Control-T, which will apply the current texture to any selected geometry and/or face. Once you have applied this texture to the walls AND ceiling, find WoodPlank_Floor_01, apply it to the floor.
Now you have a textured room, all we have to do now is add two required entities; a player start and a light. Entities are added by using the Green Marker tool, which you can place anywhere by holding down the X key, try placing it in various locations now. As you can see, its hard to control the Marker in the 2d views since it might not place it in the correct 3rd dimension as well. Placing it using the 3d viewport can solve this, so lets try and place the marker off the floor somewhere inside your room:
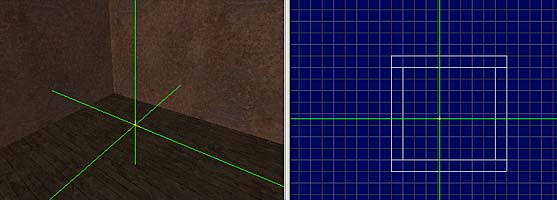
Now there are two ways of adding entities to your world, you can go through the Project Window in the Classes Tab, double click the Startpoint entity and one will appear in the location of the Green Marker. The other way to add it is to right click in a viewport and select Add Object at the bottom of the right click menu:
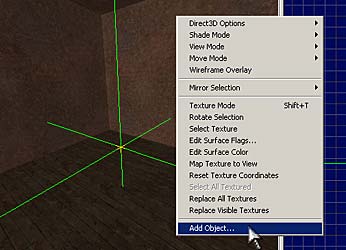
Once again you will be presented with a menu, find StartPoint and either double click it, or select and hit OK.
Ok, now that we have a start point we could compile but lets add a light so we can see something. Move the marker near the ceiling and once again, use either method to add the light entity, leave it at the default light level of 300, well get into more advanced lighting later on.
Now you are ready for your first compile, go to World/Process, once again well get into advanced compiling options later, for now the default will do just fine. Click OK, the compile should take mere seconds for this size of map. Once it’s done, click World/Run or the little rocket icon on the toolbar:

Your world should load .
When you are ready to compile a world you have to tell the editor to process the level. This can be done by selecting WORLD -> PROCESS or by pressing the keyboard shortcut CTRL-P. This will bring up the GOProcess application. GOProcess has many options. Here is a short description of the available options:
GOProcess is divided into five main sections.
Replace Textures – this flag allows you to replace the textures in a level without doing a full compile. To do this you will have to change the texture in the editor (note that any scaling, fitting or changing of the texture coordinates will not be updated in a texture replace) and select Replace Textures, Import Geometry and Import Texture Flags with no other Geometry, Lighting or Visibility flags set.
Apply Lighting – this flag must be set if you want to light your level. If this flag is not set then all other flags in Lighting are irrelevant.
Light Animations – this is not currently being used.
Shadows – this flag tells the world to cast shadows from geometry.
Vertex Lighting Only – this flag is used for a quick compile and temporarily sets all the world geometry to use all gouraud shading rather than lightmaps.
Full Optimisation – this flag tells the processor to compile your level and optimise it.
Fast Approximation – this is a fast version of an optimised level and will not have the best poly counts.
Splitweight – The splitweight of a level is the amount the level is divided up into smaller pieces. At a setting of 1 the world attempts to preserve the splits the designer placed in the level. Set at .5 the splitweight will divide up the world into smaller pieces. You will need to experiment with these settings to know which splitweight you should use for your map.
Radiosity is a lighting feature that allows light sources to naturally light a world as real lights would do. This allows indirect light to bounce around and light a world. The more bounces you set the more times the indirect light will bounce through a world. The more bounces you select the more processing time required to light a level.
If you are changing only entities in a level (the position of a model, start positions, a sound entity etc. then you can often do an entity only compile. To do this, modify your entities and then start GOProcess. Turn off all flags in Geometry, Lighting and Visibility. This will do an entity only compile and is much faster than doing a full compile. If you change any geometry or light values these changes will not be compiled.
To make a simple skybox select the sky texture under textures/misc. Then using the "Brush Creation Mode" drag out a cube that's 512 x 512 x 512 units.
Then hollow the cube using 32 as the thickness. Then select the hollowed cube and click the "Center Marker on Selection" button, then right click and select bind to object. In the "Object type window" select DemoSkyWorldModel. Now select the DemoSkyWorldModel node in the "Nodes List" and change the SkyDims field to 256 256 256. The inner walls of the cube can now be textured.
It's possible to add items to the sky, such as a moving cloud layer, a sun, geometry; like hills off in the distance and mood lighting. Every item that gets added to the skybox must have a sky pointer with the proper index. For example, to make a cloud layer create a flattened cube in the upper 2/3 of the skybox with the invisible texture on it. Then apply a cloud texture to the bottom of the flattened cube. Make sure the texture has "Use 444 in 16-bit mode" checked. Then in the nodes list select the flattened cube then go to it's properties, now make translucent true and all other fields false. Then click the "Center Marker on Selection" button, then right click and bind to Translucent. In the "Nodes List" select the translucent node and rename it to clouds. Now select the skybox and click the "Center Marker on Selection" button, then right click and select "Add Object" and add a SkyPointer. In the "Nodes List" select the SkyPointer, then in the SkyObjectName type clouds and set the index to 1. To make the clouds move, select the flattened cube and type Pan in the "Effect field" and 0 30 in the "EffectParm field".
The sky suddenly stopped working - make sure the SkyPointers are still pointing to the correct name.
The sky seams are visible when I run the map - Select each face and increase the scale by .1 unit then hit the centre button.
To add one of the Global Ops skyboxes to your level, go to the ‘Prefab’ tab in the project window and select the ‘Skyboxes’ directory. MAKE SURE THAT TEXTURE LOCK IS ON and double click on the skybox you desire and place it where you wish in your world. Left click and drag the skybox to where you wish in your level.
To Place a prop in your world, use the Green Marker to determine the initial location of the prop, now right click in a Viewport/Add object and find prop or in the classes tab, find the prop entity and double click it. Now you should have a little square that represents the props centre, while it is still highlighted, go to the properties tab and see what’s inside:
Rotation – Rotate the prop
Filename – Select the .ABC file of the prop
Skin0-3 used to set the .DTX texture applied to the model (Max is 2)
Placeholder – Sets the .OBJ used to represent the prop in the game world (If one has been exported for it)
Visible – Make the prop vanish
Solid – Turn this off if you don’t want to use the prop’s bounding box (NOTE. Many of the props in GO don’t use the props bounding box for player collision. Since the bounding box must be a box centred on the prop during export, in many cases it creates an unrealistic and unacceptable result. The ModelCollision entity must be used and the bound itself to the prop it surrounds (covered later))
Gravity – Toggles the effect of gravity on the prop. If this is set to TRUE, props will fall to the ground when the game is run. This is problematic with many props because they don’t have accurate bounding boxes
DetailTexture – Not supported
Chrome – Not supported
TranslucentTexture – Turns on the translucent areas of a prop, if a alpha channel is present in the .DTX
Alpha – Sets the translucency level of a prop without the use of an alpha channel on a scale of 0 to 1, 0 being transparent
ChromaKey – Selects the type of transparency used
Additive – Engages additive rendering (The texture should be made to support additive which is simply a process of adding the values of the pixels in the texture to the background)
Multiply – A variant of additive
Scale – Lets you scale the prop
Animate –If animation frames are present in the model, it will animate constantly if this is set
Sound environments provide a capacity to control and specify the sound dynamics within a given area. This is particularly useful when trying to reflect the differences in the environment with respect to sound dynamics appropriate to that area. An example of this is best seen (or listened to) in Quebec, which has a variety of sound environments to correspond with the variations in the environment. For instance, players find themselves crossing from “inside” playable areas, to “open-air” regions in the map. Changing the dynamics of the sound environments between these different zones helps the player gage these subtle differences.
To build a sound environment you must generate a brush for the entity to be attached to. Since the sound environment works on a volume basis, the effects of the sound environment are limited to all areas inside this brush. If one brush is not sufficient to encompass the desired area, several entity bound brushes with matching values will ensure the whole area achieves the desired sound dynamics. As when binding any brushes to entities, it is important that your marker is centered inside the desired brush/es. Once this is done, bind the brush to the SoundEnv class(right click and select Bind to Object). Now you have a sound environment. It is possible to have a sound played within this sound environment, this particularly helps when trying to define inside/outside areas, where there would be an ambient sound specific to given region. Giving your sound environment it’s vital characteristics is done by adjusting the entity’s properties, where the user can specify the reverb type (what variety of environment), reverb depth where 0 is your lowest value and 1 being the maximum, ambient sound which refers to the wav file you desire, if any at all, volume, and air density. Think of your sound environments as sectors, much the same way that a players location is calculated by which sector he occupies at any given time, sound environments dictate the sound dynamics for any player that occupies it.
Speakers help the user achieve a sound source play from a defined location only. This is most beneficial when there is an object located in the world which would have a specific sound associated to it. For example, should you have an air vent within the map it would be expected that there would be some sound generated from it, which helps establish it’s functionality. The sound emanating from a speaker has a sphere of influence, as it were. The closer to the speaker or origin the player is, the louder the sound, and likewise, the further away the player, the softer the sound. The sound is only audible within it’s sphere of influence, which allows for greater user control.
To create a speaker, simply position the marker at the location you wish the sound to originate from and select the Speaker class from the list. A Speaker entity will be generated at your marker, which can then be characterized by adjusting it’s properties. This will allow you to set the attenuation which defines the extent of the speaker’s sphere of influence, the sound file to be played, and the volume.
Setting up Teams requires the use of quite a few entities. Below is a list of the entities required to set up 2 teams, each with 12 players per side, 1 initial spawn per side and 1 respawn per side. The initial spawn is pretty easy to set up, but the respawn requires setting up the TTD (Troop Transport Device) vehicles as well. Have a look at the TutorialTTD.ed, this contains a simple map with all the items listed below, hooked up correctly. In most cases you can just copy/paste these folders from that map into a new map.
When modifying entities make use of the B (browse) icon beside entries, inside an entity. It appears beside entries that are to be linked to other entities and opens the Object Browser displaying a list of all entities currently in the world. As well if you type entries in, it can help determine if the entry is valid. If you click the B and the Object Browser window does not contain the name entered it is invalid.
(2) Team entities – The Team entity contains the following entries:
Name A working name for the entity, usually Team1
Pos The position of the entity in the world. Does not need to be changed.
Rotation The facing direction of the entity
TeamID Important: Team1 = 0 Team2 = 1 Team3 = 2 (VIP TEAM).
StartingCash Old entry that can be ignored
MaxPlayers Sets the number of players on the team. Set to 12
Affiliation Sets the team type. (SAS, TDL, Damterrorists)
AffiliationName Sets text string for front end. Select from list or input name
Briefing Sets the Mission Briefing for the level for the team
Description A small blurb about the team.
Diagram1 Image 1 of 2 display in Mission Briefing to show level objectives
Diagram2 Image 2 of 2 displayed in Mission Briefing to show level objectives
Caption1 Caption for Diagram1
Caption2 Caption for Diagram2
InitialSpawn This points to the initial Spawn Manager for the team.
TTD1 This points to the 1st respawn Spawn Manager for the team
TTD2 2nd if necessary
TTD3 3rd if necessary
TTD4 4th if necessary
TTD5 5th if necessary
VIPTeam Set this to yes if the map contains a playable VIP and this is it’s team
HelpText Help text string that is displayed when player respawn Contains information of what the team is trying to achieve
(2) Spawn Managers – 1 for each team. Each initial spawn manager points to the Initial Spawn entry for the appropriate team.
Name Working name for the Spawn Manager
Pos The position of the entity in the world. Does not need to be changed.
Rotation The facing direction of the entity
Active Boolean flag telling whether the Spawn Manager is active
Time Initial wait time before player is initially spawned into world
DeployTime Set delay until TTD leaves deploy zone
StartTrigger Not used
EndTrigger Not used
(24) Spawn Points – 12 for each team. All 12 spawn points point to the initial spawn manager.
Name Working name for the Spawn Point
Pos The position of the entity in the world. Does not need to be changed.
Rotation The facing direction of the entity, change this to have the spawned players face a specific direction
AttachToSpawnManager This points to the appropriate Spawn Manager
AnimPose Sets the pose of the spawned player
PlaceHolder Not used
Setting up the respawn entities takes a little more work. You still setup a SpawnManager and SpawnPoints but you also need to add the TTDs and pathing for them.
(2) SpawnVehicle – 1 for each team. This defines the type of vehicle, either Helo or Truch
Name Working name for the SpawnVehicle
Pos The position of the entity in the world. Does not need to be changed.
Rotation The facing direction of the entity
MeshName This points to models\vehicles\ either the BlackHawk.abc or the TroopTransportTruck.abc
SkinName0 This points to skins\vehicle\ either Blackhawk.dtx or TroopTransportTruck_01.dtx
SkinName1 This points to skins\vehicle\Blades_01.dtx and is used only if the TTD is a helicopter
SkinName2 Not used
SkinName3 Not used.
Active Boolean flag telling whether the SpawnVehicle is active, always set to active unless you have more than 1 TTD on one side.
HasBushMaster Boolean flag telling whether or not the TTD has a Bush Master cannon attached. Used for spawn guarding.
AttachToSpawnManager This points to the respawn SpawnManager
Sound This points to sounds\ambient\ LevelSpecific_Helicopter.wav or sounds\ambient\LevelSpec_TroopTransport.wav
SoundRadius Set to 4000 for truck and 9500 for helicopter
VehicleType Set to Ground or Helicopter
VPathAdvance This points to the first advancing VehicleNode for the TTD
VPathRetreat This points to the first retreating VehicleNode for the TTD
ReverseOnAdvance Boolean flag telling whether the TTD will back up on the advance path rather than traveling forward, used only for Trucks
ReverseOnRetreat Boolean flag telling whether the TTD will back up on the retreat path rather than traveling forward, used only for Trucks
TranslucentTexture Boolean flag set for to True for Helicopters to give transparency to the blades
Alpha Set to 1.000
(2) SpawnVehicleFake – 1 for each team. This is the collision entity and brushes for a TTD. Cut and paste this entity and brushes from the tutorial level.
Name Working name for the SpawnVehicleFake
Pos The position of the entity in the world. Does not need to be changed.
Rotation The facing direction of the entity
AttachToSpawnVehicle This points to the appropriate SpawnVehicle
(2) Interior Folders – 1 for each team. This a folder that contains all the entities and brushes that make up the interior of the TTD that the player sees while enroute to respawn. Inside this folder is a sub-folder entitled SpawnPoints, here are the settings for the (12) SpawnPoints in the Interior Folder.
Name Working name for the Spawn Point
Pos The position of the entity in the world. Does not need to be changed.
Rotation The facing direction of the entity
AttachToSpawnManager This points to the appropriate Spawn Manager
AnimPose Set to Sitting for TTDs
PlaceHolder Not used
(x) VehicleNode – X number for as many are needed to move TTD into place
Name Working name for the VehicleNode
Pos The position of the entity in the world. Does not need to be changed.
Rotation The facing direction of the TTD as it travels from this node to the next
Time Defines the time between this node to the next
NextNode This points to the next node the TTD will travel to
(2) Spawn Managers – 1 for each team.
Name Working name for the Spawn Manager
Pos The position of the entity in the world. Does not need to be changed.
Rotation The facing direction of the entity
Active Boolean flag telling whether the Spawn Manager is active
Time Initial wait time before player is initially spawned into world
DeployTime Set delay until TTD leaves deploy zone
StartTrigger Not used
EndTrigger Not used
(24) Spawn Points – 12 for each team. For TTDs the SpawnPoints point to a SpawnVehicle.
Name Working name for the Spawn Point
Pos The position of the entity in the world. Does not need to be changed.
Rotation The facing direction of the entity, change this to have the spawned players face a specific direction
AttachToSpawnManager This points to the appropriate SpawnVehicle
AnimPose Sets the pose of the spawned player
PlaceHolder Not used
There are 5 major Mission Objectives. These are:
Bomb One team must place an explosive at a designated target while the other team defends or attempts to defuse a planted explosive.
Hostage One team is in control of a group of hostages and must prevent the other team from moving the hostages to a rescue zone.
VIP One player must make it to an extraction zone as one team guards and the other attempts to eliminate the VIP.
Object X number of items must be retrieved and brought to a capture point.
Control X number of areas are possible to be controlled by a team that reaches it and possibly recaptured by the other team.
The following list is the essential entities needed to create a major Mission
Objective. There are tutorial maps for each mission type with working objectives.
Here are 2 entities that need to be included in every map.
Scenario – This sets the location information about the map. It includes:
Name The working name for the entity
Pos The position of the entity in the world. Does not need to be changed
Rotation The facing direction of the entity
SenarioTime This sets the duration of the level in seconds
CashForWin This sets how much cash is given for a win
CashForLose This sets how much cash is given for a loss
DescriptionPara1 First description paragraph for level
DescriptionPara2 Second description paragraph for level
DescriptionPara3 Third description paragraph for level
Location Location name of map
Month The month the map occurs in
Day The day the map occurs in
Year The year the map occurs in
Hour The hour the map occurs in
Minute The minute the map occurs in
SatImage This points to a satellite image of the area of the map
Longitude The longitude that the map occurs in
Latitude The Latitude that the map occurs in
WorldInfo – This sets some world info for the map. It Includes:
Name The working name for the entity
Pos The position of the entity in the world. Does not need to be changed
Rotation The facing direction of the entity
NorthDir Sets the direction from the top view to which way is north
SkyPanTexture
Envmap This points to textures\envmaps\ and uses a texture there
SkyPanSpeedX This sets the move speed of X axis of skypan
SkyPanSpeedZ This sets the move speed of Z axis of skypan
SkyPanScaleX This sets the scale of X axis of skypan
SkyPanScaleZ This sets the scale of Z axis of skypan
ClipFarZ
FogColor The color of fog
FogNearZ The near clip plane for fog
FogFarZ The far clip plane for fog
SkyFogNearZ
SkyFogFarZ
WindDir This sets the direction of wind
WindSpeed This sets the speed of wind
Temperature This sets the temperature of the world for Thermal Vision
BotSight Not used
TransportSight This sets the range that the TTD BushMaster can fire
Have a look at the TutorialBomb.ed for a working bomb map. The Objectives folder can be copied out to a new map.
Bomb – This is the item that is picked up and brought to the bomb site.
Name The working name for the entity
Pos The position of the entity in the world. Does not need to be changed
Rotation The facing direction of the entity
Team This points to the team that can pick up the bomb
PlantObjective This points to the ObjectivePlant
ExplodeObjective This points to the ObjectiveExplode
DefuseObjective This points to the ObjectiveDefuse
PlantTime This sets the time it takes to plant a bomb
DefuseTime Not used
DemomanDefuseTime Not used
IsADud Boolean flag to set bomb to dud
Bomb Zones – These are the areas where the bomb could be planted. It is important to use atleast 2 zones to keep the game flowing and avoid camped out battles.
Name The working name for the entity
Pos The position of the entity in the world. Does not need to be changed
Rotation The facing direction of the entity
Attrib In this sub menu set SA_BombTarget to True and team to the team that is planting the bomb Other entries should be set to false
SectorName Type in a name that is to be displayed when a player radios to team mate from the bomb zone.
SectorIcon This points to interface\hud\bomb.dtx
Objectives – There are 4 objectives that are necessary to create a bomb mission. They are:
ObjectivePlant
ObjectiveExplode
ObjectiveDefuse
ObjectiveDefend
Name The working name for the entity
Pos The position of the entity in the world. Does not need to be changed
Rotation The facing direction of the entity
Team This points to the team that needs to complete the objective
Description Text to describe the objective in score menu
Active Boolean Flag indicating if the objective is currently active.
Tasks How many tasks are there in the objective
TasksToComplete How many tasks are needed to be complete to win the objective
Winning Objective Boolean flag indicating if the objective will cause a win if appropriate tasks are completed
Completed Boolean flag indicating if an objective has been completed or not some levels may require objects to be switched
SecondaryObjective Boolean flag indicating if the objective is only a secondary one that need not be completed to finish the level
Cash Not used
CashAward Not used
CompleteMessage Message displayed in the score card once the objective is completed
IncompleteMessage Message displayed in the score card if the objective is incomplete
CompletedSound Sound played once the objective is completed
SequencerCompleted Scripting Sequencer that completes on the completion of the objective
SequencerActive Scripting Sequencer that activates on the completion of the objective
SequencerIncomplete Scripting Sequencer that becomes incomplete on completion of the objective
NextObjective This points to the next objective in a chain
The TutorialHostage.ed contains a simple hostage map with 2 hostages and objectives set to win once the 2 hostages are rescued.
Hostages (aiPlayer) - These are the people that need rescuing in the map.
Name The working name for the entity
Pos The position of the entity in the world. Does not need to be changed
Rotation The facing direction of the entity
InGameName The name displayed when ID in the game by player
IsInvincible Boolean flag indicating if the aiPlayer is invincible
TakeDamageOnlyFromEnemies Boolean flag indicating if the aiPlayer can or cannot be hurt by team who starts with hostages
AttackOwnTeamIfShot Set to False for hostages
CanBeScared Boolean flag indicating if firefight can frighten hostage
StartDead Set to False for hostages
StayCrouched Set to False for hostages
CannotHurtPlayer Set to False for hostages
StartHealth Set the starting health for a hostage which should match the MaxHealth
MaxHealth The maximum health of the hostage
Courage The lower the number the more prone the hostage is to becoming frighten during a firefight
Difficulty Set to normal for hostages
AIType Set to Hostage
ModelName This points to the file of the hostage model
SkinName0 This points to the file for the head skin for a hostage
SkinName1 This points to the file for the body skin for a hostage
SkinName2 Not used
SkinName3 Not used
AlliedTeam Set to the team that is rescuing the hostages
ShootObject Not used
Attrib
NPCSpeeds This submenu sets the speeds for the hostage
Gun Set to none for hostages
NoGun Not used
NoSpeaking Not used
Equipment Set to none for hostages
Rescue Zone – This is the area that the hostages must be taken to in order to be rescued
Name The working name for the entity
Pos The position of the entity in the world. Does not need to be changed
Rotation The facing direction of the entity
Attrib In this sub menu set SA_Extraction to True and team to the team that is rescuing the hostages Other entries should be set to false
SectorName Type in a name that is to be displayed when a player radios to team mate from the rescue zone.
SectorIcon This points to interface\hud\rescue.dtx
Objectives – There are 3 objectives that are necessary to create a hostage mission. See bomb mission for objective entry definitions. They are:
ObjectiveRescue
ObjectiveDefend
ObjectiveHostage
The TutorialVIP.ed contains a simple VIP map with 3 teams and the appropriate objectives.
VIP – This is the 3rd team that is added to the map to create a single VIP controlled by a player. The VIP also needs a SpawnPoint and SpawnManager. See Setting Up Teams for definitions of these entities.
Extraction Zone – This is where the VIP need to enter to complete his escape objective.
Name The working name for the entity
Pos The position of the entity in the world. Does not need to be changed
Rotation The facing direction of the entity
Attrib In this sub menu set SA_VIPExtraction to True and team to the team that is helping the VIP Other entries should be set to false
SectorName Type in a name that is to be displayed when a player radios to team mate from the extraction zone.
SectorIcon This points to interface\hud\rescue.dtx
Objectives – There are 3 objectives that are necessary to create a VIP mission. See bomb mission for objective entry definitions. They are:
ObjectiveEscape
ObjectiveKill
ObjectiveProtect
The TutorialObject.ed contains a simple Object map with 2 teams and 1 item that needs to be captured by team2 and brought to a capture point.
Object – This is an item that must be picked up and carried to a specific location.
Name The working name for the entity
Pos The position of the entity in the world. Does not need to be changed
Rotation The facing direction of the entity
Active Boolean flag indicating if the object is currently active
ResetOnEnemy Boolean flag indicating if the object resets when touched by the enemy
ResetOnCaptuer Boolean flag indicating if the object resets to start location on capture
Team This points to the team that is capturing this item
SpeedReduction Set this to inhibit the speed of a player carrying the object
CaptureObjective This points to the ObjectiveCapture
CaptureTrigger Scripting event triggered when object is captured
CantCaptureTrigger Scripting event triggered when object cant be captured
DefendObjective
DefendTrigger
CantDefendTrigger
MoveObjectToFloor Boolean flag that sets the item on the ground
EquipmentId Drop down that selects capture object type
PlaceHolder Not used
Location Not usec
Capture Zone – The area that the Object brought to be captured.
Name The working name for the entity
Pos The position of the entity in the world. Does not need to be changed
Rotation The facing direction of the entity
Active Boolean flag indicating if the object is currently active
Type Set to OBJECT
Trigger Scripting event triggered when capture point entered with object
LockedTeam This points to the team capturing the object
AssignTeam Not used
Objective This points to the ObjectiveCapture
Recapturable Boolean flag indicating if the object can be recaptured
TriggerOnFirstUpdate Set to False
Cash Not used
VolumeAttrib Not used
Objectives – There are 2 objectives that are necessary to create an Object mission. See bomb mission for objective entry definitions. They are:
ObjectiveCapture
ObjectiveDefend
The TutorialControlPoint.ed contains a simple control point mission with working objectives.
Control Point – The area that needs to be reached to win.
Name The working name for the entity
Pos The position of the entity in the world. Does not need to be changed
Rotation The facing direction of the entity
Active Boolean flag indicating if the object is currently active
Type Set to VOLUME
Trigger Scripting event triggered when capture point entered
LockedTeam This points to the team capturing the point
AssignTeam Not used
Objective This points to the ObjectiveCapture
Recapturable Boolean flag indicating if the point can be recaptured
TriggerOnFirstUpdate Set to False
Cash Not used
VolumeAttrib Not used
Objectives – There are 2 objectives that are needed for a simple mission. See bomb mission for objective entry definitions. They are:
ObjectiveCapture
ObjectiveDefend
F1: Frames per seconds
F2: Rendering Stats
F3: Freeze Visible Set – This will stop the engine from determining what world polygons and models are currently visible. It will freeze frame the visibility determination process at the point where you press this button. Press it again to switch back to normal. This mode is extremely useful to determine how the world processor is “vising” your world as you can walk around the level and see directly what is being rendered from the point you turned it on. Warning: Turning this on can cause unpredictable behavior during a game. It is not recommended that you use this with bots in the level and such.
F4: Flat Shaded Mode – Turns all world textures off. Useful for viewing unlit levels and such.
F5: Show Splits – Flat Shaded Mode must be on for this to be functional. This will show you exactly how the world processor is cutting up your world when it builds the bsp. Extremely useful when trying to reduce poly counts.
F6: Show Memory Allocations
F7: Debug Camera – Detaches the camera from the player model. Your world representation will stay where you left it at last. The console command “debugcameramovespeed” allows you to set the movement speed for this mode. Extremely hand for getting around a level quickly and viewing it from odd angles. Also you can fire and reload in third person with this mode toggled on.
F8: ScreenShot – Saves the current display to disk. This picture will be in the root of your engine directory.
F9: Reload Sound Files
F10: Debug Ballistics Mode – Gives a complete detailed description of the ballistics at work for every shot fired. Includes data for the player damage system too.
F11: View Model Placement Tool – Allows repositioning of the view model currently on screen. Use the arrow keys slide it around, and the strafe left/right keys to push and pull it. Holding down ctrl (Jump key) and playing with the arrow keys allows adjustment of the vertical and horizontal FOV. Holding down the space bar (Use key) and playing with the arrow keys and strafe keys allows rotation adjustment. Holding alt during any of these operations allows fine control of the movement. Firing, reloading, switching weapons etc. are all allowed in this mode. Though there is no way to change the placement settings for the existing items in the game, or a way to add new ones, so this tool is nothing but an interesting toy now.
F12: Unused – Press at your own risk.
General Notes: Pressing TAB with the console down (Tild key) will complete most known commands from the text that is written. For example, typing “numc” and pressing TAB will complete the word “numconsolelines”. If there are multiple commands that match the given text, the first will be chosen and repeated presses of TAB will cycle through them. The Escape key will cancel a line with text on it. PGDN\PGUP will cycle through off screen console text. Console commands are not case sensitive. Typing most commands without entering a value will display the currently set value. There are tons of console commands not documented below in use, but we’re only listing the ones we feel are relevant to level construction.
numconsolelines – Sets the current number of console lines displayed on screen when the console is not open.
wireframe – Turn wire frame mode on or off. Set to 0 (off) or 1 (on).
forceclear – Turn back buffer clearing on or off. Set to 0 (off) or 1 (on). Wire frame mode without this on is pretty much useless.
fov – Change the current fov. Takes 2 parameters, the horizontal and vertical field of view (i.e. fov 90 60).
ModelBoxes - Turn model bounding box rendering or off. Set to 0 (off) or 1 (on).
ModelHitGroups – Set to 0 (off) or 1 (on). For models that have Hit Groups, this displays the individual Hit Groups and their extents, as well as rendering the models skeleton. Model Hit Groups are spheres that are used as the second test in bullet collisions with models (The first is the models box, and the last is the polygons on one of its LODs).
FlattenWorld - Does exactly what it says. This is the tool we use to make tac maps (the overhead views for the Intel officer and spectators). Set to a number between 0 and 100? The number that you enter can vary in effectiveness from level to level. Essentially this tool is something of a hack. You will have to play with it to get the results you want. Unfortunately this can only be set once, if you want to set a different value you will have to exit and run it again. Engage this then use the Debug Cam and pull way out above the world, line up your shot and take a picture. Be sure to switch your resolution to 1600 by 1200 and turn force clear on when you take these pics. We also touch them up afterwards and add many little details to pretty them up (fill in the empty areas, etc).
lightmap – Turns light maps on and off. Set to 0 (off) or 1 (on).
quit – Guess.
Sorry for the briefness of this section, we will try and fill it out more so later if needed.
SpriteFX: Will spawn a specified SpriteFX at the point the entity is placed in the direction it is orientated. At this time it is not possible to create your own SpriteFXs. Please reference the included document “Sprite-Effects Descriptions.doc” for the numbers of some pre built SpriteFX that already at use in the game. This is a point entity, it is not to be bound to a brush.
SpriteFXID: The number of the SpriteFX to spawn.
Perpetual: Set to true if this is a SpriteFX that should always persist in the level, i.e. it is not triggered by something else. This would be for something like a waterfall effect, or a light halo, etc. Non perpetual SpriteFX must be triggered to engage.
GunSpawner: Places a gun in the level. Use the Rotation to set the guns orientation. These guns will respawn on level restarts, unlike the guns placed by GunServers. This is a point entity, it is not to be bound to a brush.
GunId: The gun to place.
PlaceHolder: Unused at this time.
EquipItemSpawner: Places a piece of equipment in the level. Use the Rotation to set the items orientation. These items will respawn on level restarts, unlike the items placed by EquipItemServers. This is a point entity, it is not to be bound to a brush.
EquipmentId: The item to place.
PlaceHolder: Unused at this time.
Destructable: Any brush that is bound to one of these can be destroyed. Keep in mind these brushes do not occlude. If you make an entire level out of these there will be no vising and your performance will suck.
DamageMask: Set what kind of damage this destructable can take.
Parent: This destructables parent.
Health: How many damage points it takes to destroy this destructable (a player has 100 health points, the lowliest handgun does about 20, the evilest sniper rifle about 150).
BreakForce: The force of an impact that it would take to break this destructable. Just leave at 0 to not use this feature.
RetrigDelay: How long before this thing can be triggered again. Leave at 1 to not use this feature.
Alpha: The alpha value of this object, 0 – 1.
BlockLight: Set to true to make this thing cast shadows. Not recommended if it’s going to be destroyed.
SpriteFX: The SpriteFX number that is spawned by this item when it is destroyed. Leave at 0 to not use this feature.
Trigger: A link to another object that is triggered when this is destroyed.
Team: If specified, then only the team(s) specified can destroy this object.
Visible: Set to false to make this invisible initially.
SFX_BreakDir: Choose an option to control which direction the SpriteFX specified by SpriteFX will spawn in.
DynamicBreak: Set to true to make this object be dynamically broken at runtime when it is destroyed. A SpriteFX isn’t necessary to make this look right if specified, but this effect does not look great on all kinds of brushes. Should be limited to flat panels and such (doors, walls, glass, etc).
Objective: Can be linked to an Objective if breaking this object is to satisfy a level objective.
IsGlass: If DynamicBreak is true, this can be turned on to invoke the glass effect. Every shot will cause this destructable to splinter then.
Solid: Set to false if this object is to be non-solid initially.
DestructableModel: Essentially the same as a Destructable, except a model is used instead of a brush. This entity should not be bound to a brush. A model (abc) filename and at least one texture must be specified. These can not be dynamically broken.
ModelCollisionBox: This is an entity that is bound to a brush that will represent the player collision for a model (abc). A model that has Hit Groups (see ModelHitGroup console command for an explanation) can be added as the parent to this entity, and then any bullet hits that this brush receives will be passed on to this model.
Solid: Set to false if this object is to be non solid initially (can be triggered by a ScriptShow to change this at runtime).
Parent: See the description above for what this does. This must be a link to a Prop or DestructableModel.
BlockLight: Set to true to make this thing cast shadows. Not recommended if it’s going to be destroyed.
Damage: Bind this entity to a brush to make it a damage brush.
Type: The type of damage that is assigned to the player that touches this brush.
Team: If specified, the teams that can be affected by this brush.
Damage: The damage this brush assigns to a player on one touch.
Delay: If non zero, this is the amount of time before a player inside this brush is hurt again.
DamageRadius: This replicates an explosion blast, not unlike a grenade or law explosion. There are no visual effects spawned directly by this entity. This is used in cars and such that can be exploded to produce an explosion of their own that can damage nearby players.