e_T’s Funky Tutorials Volume 2
By Etienne Rheaume
Extra informationprovided by Cory, Milo and the Mumfinator
These are merelysuggestions and guidelines to go by, always feel free to
experiment beyond theboundaries I set forth in this and other documents,
I just hope thisserves as an explanation of why some of the experiments may fail :)
Some general gamedesign knowledge can be picked up from sites
such asGamedesign.net (
Check them out!
This document maychange if there are additions to be made or corrections to address so if
you have anysuggestions or comments, please direct them to
PLEASE no mappingquestions :)
Use the forums…
Content:
1. Sounds
2. Basic light beams,halos, basic FX
3. Adding lights
4. Leaks
5. Optimizingpolycounts/performance
6. Easy, simpleterrain using triangle method
7. Terrainimport/export from MAYA
8. Basic Fog
There are two ways of adding sounds to your level; astand-alone speaker entity
and binding a soundenv to a brush to determine thearea where the sound will be audible.
First lets look at a speaker:
SPEAKER
For this example I’m going to load the gas generator fromMexico as a prop, place the green marker
somewhere (X to place) near the ground and rightclick/add object/prop
Set the propertiesfor the prop like this:
· Filename models\Props\generator.abc
· Skin0 skins\Props\generator.dtx
· Placeholder models\Props\generator.obj
· Visible, solid and translucent set to TRUE
Now you have a generator but its silent, lets add aspeaker entity by right click/add object/speaker
Bump the entity over a few units so you can see it (usethe arrow keys), and go into the properties:
.jpg
Looping – TRUE
Sound - sounds\worlds\mexico\LevelSpec_Mex_GeneratorSmall.wav
Attenuation – This determines the radius where thesound will be heard, this can be deceiving as the drop-off
is fairly high, set this to 1200 for now, see how there isan orange circle to represent the radius
Volume - 100 - Adjusts the volume of the sound file, in between 1 and 100
Onbydefault – TRUE - This sets whether the speaker is on or off when it starts. To be usedwith minretrigdelay, etc for trigerable speakers
That’s it! You should have a sound being generated fromthat point, move it around or adjust it if you need to.
SoundEnv
Start by deleting the speaker from the props general area;well use the generator again
This is pretty much the same kind of thing as speaker butyou use a brush to determine the
sound’s audible area. Start by creating a 512x512x512brush around the generator and texture it
with /misc/sound_environment:
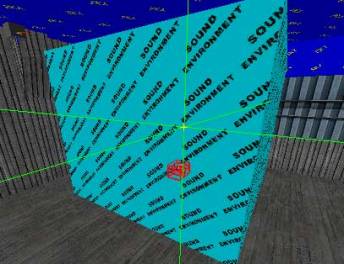
Bring the marker to the center of the brush while you haveit highlighted by hitting
Marker to selection button:

Now bind this brush to a soundenv by right click/bindto object/soundenv. Fly inside the
brush and select the entity itself (or ctrl-click it inthe node view) and add this line
to the ambient sound box: sounds\worlds\mexico\LevelSpec_Mex_GeneratorSmall.wav
The volume percent in a soundenv is measured on a 0to 1 scale, so use 1 for now.
That’s it, you should be able to hear the sound when you areinside this brush volume,
which of course is invisible now that you have bound it.
2.BasicLight Beams, Halos, basic FX
In order to add fx to the level, its important to realizethe limitations of the sprite FX system, these
should be added sparinglyin order to keep the framerate and general game performance to a
good level for all players. Having a smokingvehicle or fire here or there would be ok but
resist temptation to addtons of FX just because you can !
The sprite FX will begenerated from an entity called spritefx,so place the green marker (X to place in viewport)
and right click/addobject/spritefx
Using the Rotation properly you can aim some of thebeams the way you desire; while the usage of the perpetual flag will
ensure any looping FX do so, keeping it false is usefulfor one time fx such as explosions, etc
Here is a list of some of the fx available:
Fire (with smokeand sparks)
Sprite Effect ID:
Info:
Designed for oil barrels, but works in many other scenarios.
Fire (withoutsmoke and sparks: better on fps)
Sprite Effect ID:
Info:
It’s much better on the framerate.
More Fire (withoutsmoke and sparks: better on fps)
Sprite Effect ID:
Info:
Smoke: Chimney
Sprite Effect ID:
Info:
Frosty Steam Vent
Sprite Effect ID:
Info:
Smoke: ArgentinaServer
Sprite Effect ID:
Info:
Smoke: White
Sprite Effect ID:
Info:
Sparks
Sprite Effect ID:
Sprite Effect ID:
Info:
Water CoolerBubbles
Sprite Effect ID:
Info:
Halo: Quebec
Sprite Effect ID:
Info:
Halo: South ChinaSea
Sprite Effect ID:
Info:
Halo: Lima
Sprite Effect ID:
Info:
Halo: Colombia
Sprite Effect ID:
Info:
Halo: Red Light
Sprite Effect ID:
Info:
Halo: Blinking redC4 light halo (with beeping sound)
Sprite Effect ID:
Info:
Spotlight
Sprite Effect ID:
Info:
Blowing Snow
Sprite Effect ID:
Info:
Constant Light
Sprite Effect ID:
Info:
Flashlight
Sprite Effect ID:
Info:
Streetlight
Sprite Effect ID:
Info:
Streetlight:Tunnel Level
Sprite Effect ID:
Info:
Waterfall Mist
Sprite Effect ID:
Sprite Effect ID:
Sprite Effect ID:
Sprite Effect ID:
Sprite Effect ID:
Info:
Candle Flame
Sprite Effect ID:
Info:
Steam: TrainingLevel Vents
Sprite Effect ID:
Info:
Not recommended for Multiplayer maps, due to the frameratehit.
3.AddingLights
There are two types oflights available to you in Global Ops, a simple
omni style “light” and
This stuff is pretty basicso I’m not going to cover it extensively, just play with the settings:
LIGHT
Use the green marker (use X to place) to pinpoint a targetlocation for your light, then
right click/add object/light and you should have a lightentity sitting there, lets
look at its (usable) properties:
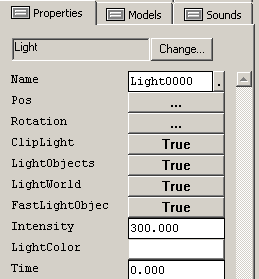
Lightobjects – Determines if the players/props willbe lit by this light
Lightworld – Determines if the world will be lit bythis light
fastlightobjects – Always set to false
Intensity – defaults to 300, sets the brightness ofthe light
lightcolor – Color picker for the light color
DIRLIGHT
A dirlight is just a spotlight, fairly easy to use, sameoptions as above except
you use the rotation settings to alter itsfocus(which way its pointing)
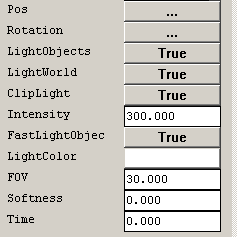
So the only change is you use rotation for pointing itand:
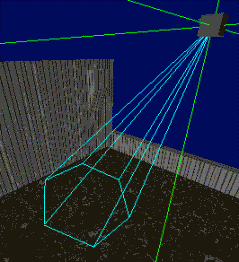
FOV- Sets the FOV (field of view) of the lights“cone” (see image bellow for blue cone)
Softness – Sets the softness for the lights cone,its best to set this to 1, since 0 will give you jagged edges
Hopefully you have an idea of what a leak is, but in caseyou don’t, let me
quote Milo’s explanation from the forums:
Imagine your world asa “submarine”. Which means that the inside must be sealed
from the wateroutside. This is exactly the same for worlds, only there is no water,
just a void outsidethe maps. When building a map, you should always ensure that
there are no holesor gaps which undermine your seal, otherwise you will have a leak.
When processing, animaginary atom is bounced around the inside of your map,
this should neverleave your map, much like air isn’t allowed to escape submarines.
If it doesn’t thenfine. However, if there is a hole, this atom will bounce out of the world,
and a LEAK will bereported. Stop the processor and under “world” select “debug” and
click on “load leakfile”.
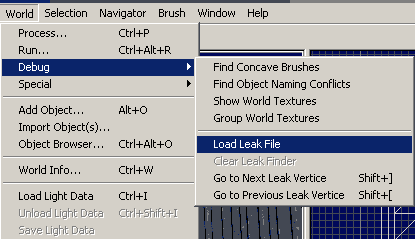
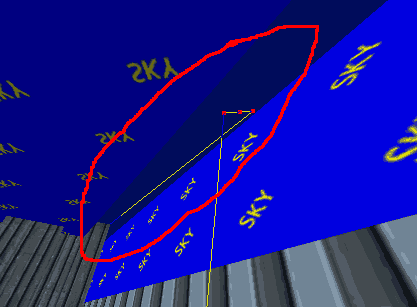
This will displaythe atom’s flight path around your level.
To find the leak followthe path until you see it leave the world to the void outside.
Where it leaves,will be where your leak is so fix it!
The reason worlds have to be sealed is an old one, BSPengines
require a defined area of play in order to optimize theminto smaller areas
which are loaded in real time, if there is a hole in yourlevel, the compiling
utilities think that the void outside is also a playablearea, making the
compile times virtually infinite.
A leak can be as small as 1x1 unit so map clean and careful!
The Global Operations codebase doesn’t allow for massivelycomplex worlds in terms of on screen polygon counts,
so its important to keep that in mind when creating areasand adding detail. The limits are covered in the document
that came with Goedit, but its important to understandwhat they are and how to view the readout in game.
While in game, you want to bring the console down byhitting tilde (~) key, from here you can
type in these useful commands:
Most commands in the console work on a 0/1 basis, whereas0 is off and 1 is on
Also most of the time if you type in the first fewletters, hit TAB and it should auto complete commands
· NumconsolelinesA number between 1 and 20, 14 is all you should need, this will determine the
amount of console lines visible at the top of the screen,0 will give you a clean screen
· Wireframe 0/1Turns on the wireframe mode, MUST be used in conjunction with forceclear towork right
· Forceclear 0/1 Usingwireframe without turning this on will give you a “hall of mirrors” effect,which will
make things difficult, so use both together
· DebugcameramovespeedThe number added to this command determines the flying speed when in F7
mode, the default is waaaay too slow for me; I set it to1000-2000 sometimes.
Those are the basics, you want to have at least 14 consolelines visible to display the information you will need to view,
now lets look at the hotkey options we have (Blatantlycopied from the Goedit.doc, thanks Seamus)
F1: Frames perseconds
F2: Rendering Stats (Polycounts, model poly counts,visible leaves, etc)
F3: Freeze Visible Set – This will stop the enginefrom determining what world polygons and models are
currently visible. It will freeze frame the visibilitydetermination process at the point
where you press this button. Press it again to switch backto normal. This mode is
extremely useful to determine how the world processor is“vising” your world as you
can walk around the level and see directly what is beingrendered from the point
you turned it on. Warning: Turning this on can causeunpredictable behavior during a game.
It is not recommended that you use this with bots in thelevel and such.
F4: Flat Shaded Mode – Turns all world texturesoff. Useful for viewing unlit levels and such. Example:
As you can see, F4 shows me thepolygons without textures

F5: Show Splits – Flat Shaded Mode must be on for thisto be functional. This will show you exactly how the
world processor is cutting up your world when it buildsthe bsp. Extremely useful when
trying to reduce poly counts. Example:
Now we can see howbrushes touching other brushes can cause Facesplitting, an ugly side effect but
oneyou must deal with. I will suggest waysaround this later on but overall it’s a common thing among BSP engine. Noticehow the stairs themselves cut into the sides of the runner, and how the runnerin turn cuts into the ground, increasing the polycount

F6: Show MemoryAllocations
F7: Debug Camera – Detaches the camera from theplayer model. Your world representation will stay where
you left it at last. The console command“debugcameramovespeed” allows you to set the
movement speed for this mode. Extremely hand for gettingaround a level quickly and
viewing it from odd angles. Also you can fire and reloadin third person with this mode toggled on.
F8: Screenshot – Saves the current display to disk.This picture will be in the root of your engine directory.
F9: Reload Sound Files
F10: Debug Ballistics Mode – Gives a completedetailed description of the ballistics at work for every shot fired.
Includes data for the player damage system too.
F11: View Model Placement Tool – Allowsrepositioning of the view model currently on screen. Use the
arrow keys slide it around, and the strafe left/right keysto push and
pull it. Holding down ctrl (Jump key) and playing with thearrow keys
allows adjustment of the vertical and horizontal FOV.Holding down
the space bar (Use key) and playing with the arrow keysand strafe
keys allows rotation adjustment. Holding alt during any ofthese
operations allows fine control of the movement. Firing,reloading,
switching weapons etc. are all allowed in this mode.Though there is
no way to change the placement settings for the existingitems in the
game, or a way to add new ones, so this tool is nothingbut an
interesting toy now.
F2 is the important one, you will want to use thata lot when play testing your levels, lets look at an example:

· World Polies is your master polycount, that’s your newgod, learn to worship it
· Model triangles is all props, guns (including the onein your hands), other players
· Num Clip and visible leaves are discussed bellow
1.
worldand still expect a multiplayer level to perform well. The maximum polygon countin a
givenview for GO should always remain below a maximum of around 800 polygons.
Thisshould not be considered the average number of polygons you are shooting for.
Ideallytry to keep your poly counts as low as possible in every area of your map butan
averageof 400 polygons at any given time should be ideal.
2.
3-4000 MAXIMUM.This counts the view model of your current weapon, and any
visibleprop, gun or player. Like world polys,the lower the model polys are, the faster
theworld will run.
3.
otherlarge area without major Visibility blockage such as a path through a buildingwill add
tovisible leaves. Once again going above 700-800 may have an impact on framerate.
4.
Largernumbers of polygons e.g. partially off-screen will induce a larger value fornumcliptest.
It isbest to keep this number below 5000 in a typical world.
5.
include player skins and props. The trick is to use optimized texturesand reuse textures in
imaginative ways. The best way to optimize new textures is to keep themsmall, a 256x256
cinderblock wall texture might have dozens of block but unless it is painted with apattern
or has damage/water leeching on it, you only reallyneed one block to tile. This may not work
in some cases or look wrong but it’s important totexture smartly
.
So here we are going to cover two things, polycountoptimization and texture count.
There are a few ways to limit your polycounts in the game;the first one is the tried and true S-curve technique:
When the compiling tools are set to FULL they will try andfigure out what areas are visible from where, and use
That information to split up the map into visibilitysectors, your job is to ensure that when standing in one such sector,
You can see the least of the next sector so you candedicate the polycount to the current area.
S-CURVE design
For example, I’m going to make two rooms connected by astraight hallway; the second room will have a bunch
Of pillars to increase the polycount in that room:
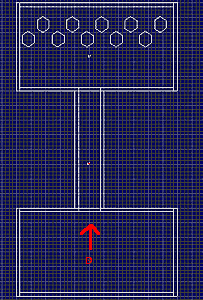
Now standing where the arrow is, and anywhere in that roomwill see into the other room, the polycount reaches
120 or so. Quite high for a simple room, that’s becausethere is a direct line of sight into the other area.
Im going to change the design a little to reflect theS-curve concept, I’m going to make the hallway into an S-shape
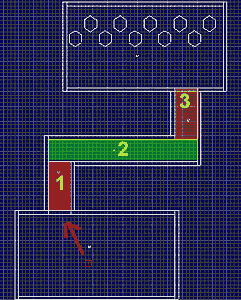
Now standing where the arrow is the polycount drops to 20,since I’ve made an S-curve to break up the
Line of sight. In fact it will not render the room withpillars until I enter the #2 area. But since the #2 area
Extends all the way from left to right, as soon as I touchthe floor polygon that makes up #2, it will render
The pillar room. UNLESS, I break up the #2 floor brushinto two, making it even more optimized (To a point)
I hope that makes some sense, I read a tutorial on thismany years ago and this is the easiest way I can think to
explain it. So if you look at our maps you will see how weuse this all the time, in certain cases, like Lima,
we wanted to make the lobby area wide open from thestaircase to the outside, now that would mean that leaving the
troop transport device and approaching the mansion, thepolycounts would be 2000 or so, that is not acceptable so
Chris made a VIS blocking wall that you have to walkaround just inside the front door. Not pretty but these are the
things you have to do to make playable levels, just useyour imagination!
How to limit splittingwith detail entities and other tricks
Well there is only really two ways to help this:
1. Don’t have things touching other polygons. Now this maynot work in all cases, in terms of aesthetics, but
in most cases it wont look weird unless you can actuallyget to a place where you can see the gap.
For example we have the pillar room bellow, with thepillars touching the floor and ceiling you can
see how they are splitting those surfaces into a 100 extrapolygons, which could be used for detail.
By simply scaling the pillars so that there is a 1 unitgap in between it and the floor as well as the top face with the
ceiling, I stop the splitting, which reduces my polycountby 100, not bad when your total limit is 800.
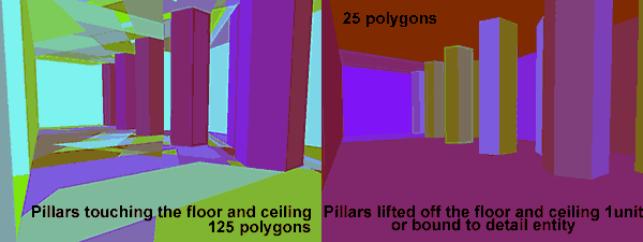
2.Use detail entities. The other way to stop this is toturn the offending geometry into a world model, like a translucent
or detail entity, by binding it. Obviously a translucentwon’t work here so we would bind it to a detail entity, which will stopsplitting
even if it is touching the surface.
*KEEP IN MIND; you should only have 64 detail entities perVIS group, meaning I could have 64 in the pillar room,
and connecting areas but no more.
Speeding up theVIS section of compiles:
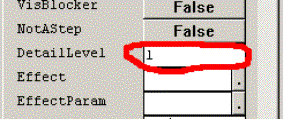
Something you MUST do for maps with large area is the useof the detail 0/1 flag in the brush properties.
This must only be used on geometry that DOES NOT SEAL theworld, or else it will generate a leak. Once you turn this
to 1, the brush stops becoming a VIS blocker, although itwill not help the splitting problem.
This should only be used on geometry that is trims,detail, chairs, tables, and anything else that
is just “filler”.
Brush set to detail1
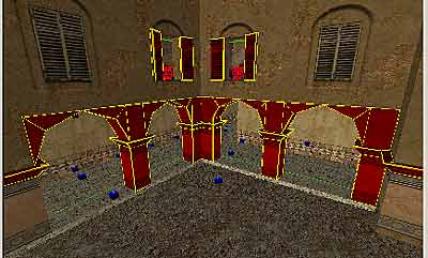
For example the screenshot bellow from the courtyard in Mexico,the VIS blocker are the wall, floors, ceilings
but as you can see the arches and pillars are not, theyare turned to Detail 1 in the brush properties, this
lowered the VIS time by 10x, which can mean the differencein between a 2 hour compile or a 40 minute compile.
Ps. 40 minutes is better!
TEXTURE COUNTS:
Its important in any game engine to limit your textureusage to what is needed, and to
set yourself a proper goal for texture limits. In GO’scase, you should limit your texture
usage to 22 megabytes or so in the texture readout, whichI will show you how to get:
In the texture tab of the project window, right clickwhere the texture names appear and
click View TexturePalette:
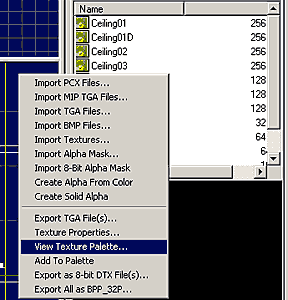
A box will pop up, click View Used Textures, andignore the request
for a name, and the next box will now give you a way tosee what textures are being used in your
current level. Now to see an actual numerical display oftexture usage, right click once again in this
window and click View Usage, ignore the error message anda texture usage report will appear:
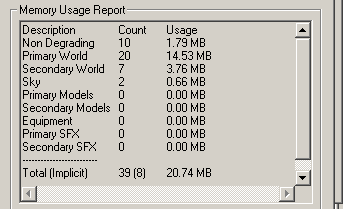
The total textureusage here is 20.74 megabytes
To ensure people play and enjoy your levels you shouldstay bellow 25 Megabytes BEFORE
adding Troop Transport devices, the TTD’s themselves add2megs for truck and 6 for helicopter.
6. Easy, simple terrainusing triangle method
Using triangles to make simple terrain areas is somethingthat dates back to Quake and half-life so I’m
only going to cover it briefly. Load up theterrain_tutorial.ed file that came with this document, the
basic room is split into two areas with a concrete blockdown the middle, one side will be used for
this tutorial, and the other for Maya terrain (If used).

On one side or the other Im going to place the greenmarker near the floor and create a cube 128x128 and 64 units high.
Allign the cube to the floor and into one corner, with itselected were going to cut it in two by using the brush-cutting tool.
Im using a grid size of 32, I place a brush cutting pointby hitting V when the mouse is over one corner of the brush,
now I move the mouse to the other corner and hit V again,hitting ENTER now will cut the selected brush in two.
There is a bug withthe current version of Goedit, after doing vertex editing the brush-cuttingtool may not work,
save, exit andrestart Goedit to get around it.
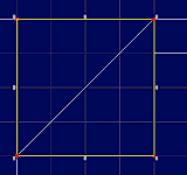
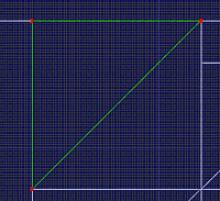
Now you should have two triangular shaped brushes, goahead and clone those to fill the area:
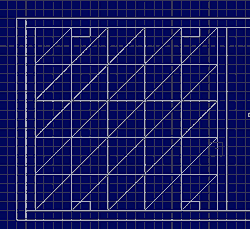
Now with careful vertex editing, you can make some uneventerrain areas, its not easy and will
take practice getting around the vertex selection bug, butits possible, just use the other view ports
and holding down control to add and subtract vertices fromyour selection.
7.Terrain Import/Export using MAYA
Ok, let me stress this at the beginning:
Terrain editingwith single sided polygons is only for advanced mappers only, if you are notfamiliar
with Maya andGoedit already, stop now and use the triangle method mentioned in the previoussection.
Its possible to use this technique from within Goeditalone but its very tedious since you cannot
select vertices in the 3d view in the current release ofthe editor, so feel free to try, I had built an early
version of the Mexico entrance canyon with Goedit only buttrust me, it was very, very tedious and annoying :p
You can go ahead and create triangulated polygons withvertices merged in MAYA and export it
as an OBJ but you will find that you need to edit the terrainso it fits into your level.
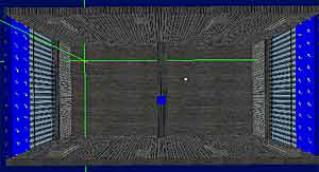
Another reason toavoid this method is that if ANY terrain vertex intersects with BSP geometry,
especially SKYbrushes, you will be waiting a LONG time for compile:
For example:
Terrainvertex embedded inside a brush
Estimatedcompile time - 4000 years
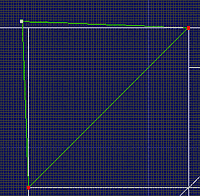
NOTE: This error is only aproblem when terrain geometry that is bound to a terrain entity is
encroaching into bsp geometry
HOW TO GET STARTED
What were going to do here is create the terrain geometryin Goedit in order to make sure
its boundaries align with the BSP geometry properly,hopefully helping you avoid the dreaded
“Forever Compile mentioned” above.
You will be following thesame first few steps as above so excuse me while I Copy and Paste:
On one side or the other Im going to place the greenmarker near the floor and create a cube 128x128 and 64 units high.
Allign the cube to the floor and into one corner, with itselected were going to cut it in two by using the brush-cutting tool.
Im using a grid size of 32, I place a brush cutting pointby hitting V when the mouse is over one corner of the brush,
now I move the mouse to the other corner and hit V again,hitting ENTER now will cut the selected brush in two.
There is a bug withthe current version of Goedit, after doing vertex editing the brush-cuttingtool may not work,
save, exit andrestart Goedit to get around it.

With both brushes selected, go into Vertex Mode (Shift-V)and in a side or front view, highlight the bottom
vertices like this:
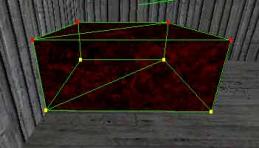
Now hit delete, and you should be left with two, singlesided brushes forming a square like this:

In order for it to be terrain you will need to set theproperties for these two brushes:
Only these to true:

In a regular map, you should fill the area you needterrain with these squares, feel free to edit them however
you want, make the larger, smaller, but its smart to keepthem on a bigger grid setting for now.
Go ahead and clone those to fill the area:

NOTE: At this point,if you don’t have Maya, you can still use this terrain and edit it withinGoedit, its not easy like
the triangle methodto alter, but very possible with practice, if you try and compile now with theterrain brushes
as they are you willget a “** Found a ZERO THICKNESS BRUSH (0)” error in the compile, which meansyou
must bind theterrain polygons to a terrain node. Do this in the same manner as you would anyother bound brush,
have all theterrain polygons selected, hit theMarker to Selection button and right click/bind to object/terrain
Now you should understand that in order for you toproperly match the terrain to the rest of your map,
you should export two obj files, one of the surroundinggeometry to use as a template to match up the terrain to
and a one of the terrain poly sheet.
So Im going to start by highlighting the brushes that theterrain will touch:
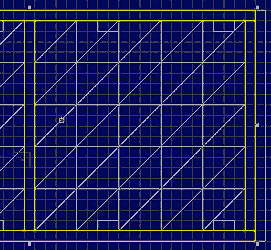
Now Hide Inverse so only those brushes are visible:
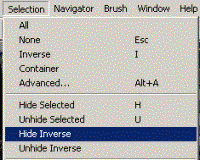
Now go to File/Export Dedit World, change the file type toOBJ and save the template OBJ somewhere,
You’ve saved the reference/template object, now lets saveout the terrain sheet,
Select all the terrain polygons and do the same as abovefor export, hide inverse, file/export dedit world as OBJ
Now Im going to assume you know how to use Maya, if youdon’t, learn it then come backJ
In Maya use the import to bring in the reference OBJ; youprobably will have to adjust your camera attribute clip plane
to see the object, next create a new layer and assignselected to the new layer, the change the layer properties to “reference”
then import the terrain itself, highlight all the verticesin it and merge them together to make editing easier.
Now you can hold V down when you move vertices and it willsnap to the reference object’s vertices, making things
a lot cleaner and avoiding the problem mentioned above.
You can go ahead and work with non-triangulated polygons,but once you are read to export make sure you do these things:
1.Triangulate the terrain brush
2.select it and export selected as an OBJ
3.in Goedit turn off the green marker, or else the terrainwill be placed at the marker (bad)
![]()
Now file/import world and find your OBJ, it should importit, make sure you right click/reset texture coordinates
as well to get the textures working right on it. Whenimported, it should bind the terrain to a terrain node for you,
so remember if you import more than one, to merge themtogether using the node view tab and delete the extra terrain entiti(es).
Once again, let me remind you, if ANY terrain vertices endup inside normal geometry, your compile time will
be astronomical, and sometimes its very difficult to findthe source of your problems, so save numbered backups often,
and work on the grid.
8. Basic Fog andthe worldinfo entity
Now there is a way to add very crude volumetric fog toyour maps but its quite limited, hence
why none of the retail maps used it, we only used globalfog, which is done through add a worldinfo.
Every map should have a worldinfo, while not crucial, ithelps a little in setting a few things
in your map, lets start by putting the green marker somewherein your level, right click/add object/worldinfo.
Lets bring up theproperties tab for this entity:
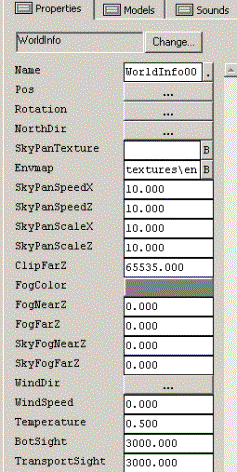
Rotation - Not used
NorthDir - Used to orient your north direction for Tacmaps
SkyPanTexture - Defines the texture used for skypanning(This allows you to add
the appearance of cloud shadows scrolling over theterrain, this only works for terrain)
Large performance hit, should not use
Envmap - Defines the global texture used for environmentmapping on models only
(We were going to use this on guns but it was it was toomuch of a performance hit)
SkyPanSpeedX - Sets the speed the texture pans in theX-axis
SkyPanSpeedZ - Sets the speed the texture pans in theZ-axis
SkyPanScaleX - Sets the X scale of the texture
SkyPanScaleZ - Sets the Z scale of the texture
ClipFarZ - This allows you to clip anything beyond acertain range; a good idea is to
set this 50 or so game units behind the FogFarZ
FogColor - Determines the color of the fog
FogNearZ - Sets the starting distance for the fog in frontof you (in game units)
FogFarZ - Set the distance where the fog turns solid
SkyFogNearZ - Sets the starting distance for the fog inthe skybox
SkyFogFarZ - Sets the distance where the fog turns solidin the skybox
WindDir - Not used
WindSpeed - Not used
Temperature - Sets the global temperature for use with thethermal goggles
BotSight - Defines how far the bots can see
TransportSight - Defines how far the TTD can see (forshooting spawn campers)