
e_T’s Funky Tutorials Volume 1
By Etienne Rheaume
-Thanks to Mumf for putting together the emporium .ed for you mappers
-Thanks to TyR for some additional info
If you have any suggestions or comments, please direct them to etiennerheaume@hotmail.com but PLEASE no mapping questions
Use the forums…
First and foremost, let me just say that a few years ago I was you guys/girls, waiting for the developers to release some info on game editing, and in that time, I’ve made a bunch of maps and got a game under my belt. I’m hoping some of you will take a leadership role in helping newbies with their questions/problems in the forums, just like I’m doing now
If you try hard enough and apply yourself, you can actually take this hobby beyond a part time thing
Ok, Tony Robbins, step aside, time for some learnin’
Content:
1.Perfect Editor setup
2.Editor Shortcuts
3.Sky setup
4.Translucent
5.Climbable
6.Explodables and Modelcollisionbox setup
7.Compiling
8.Basic Destructible glass
1.HASSLE-FREE EDITOR SETUP:
The best place to install the tools is in Crave\Global Operations with folder generation ON:

This will ensure all the tutorials end up in the right directory. But before running the editor make sure you move the mss32.dll file over from the Crave\Global Operations folder to the folder you have the tools. Now you should be able to load the editor properly, by running the Goedit.exe file.
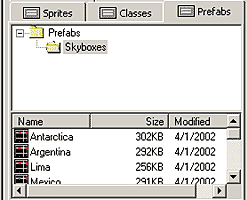
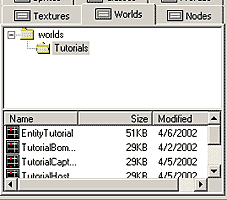
First thing you will want to do, and every time you run Goedit, is to load the project file, in this case, globalops.dep in the /globalops folder. Once you have done that, all your resources should be available in the project window, for example you should be able to find the skyboxes in the Prefabs Tab as well as the tutorial levels in the Worlds Tab:
2.Editor Shortcuts:
Shift-click Clone a brush or object by holding shift while moving said object, hold shift
until AFTER you let go of mouse button
Shift-A Face mode
Shift-V Vertex Mode
Shift-S Selection Mode
Shift-B Brush creation mode
Shift-Z Maximizes Current viewport
V Brush cutting mode
Ctrl-A Color assignment (Assign color selected from View/Color Selection)
Ctrl-alt-G Groups selected objects into a new node
Ctrl-alt-R Runs the game
Ctrl –P Process shortcut
Ctrl-T Applies selected texture to selected brush
X Moves the marker grid-point closest to cursor in active viewport
Ctrl-H Carves selected brush
H Hides selected brushes
U Unhides selected brushes
R While in Face/Texture mode ‘R’ takes the texture from the selected face and
applies it to the face the cursor is over in the 3D window (AMAZING to use)
NOTE: If R is not working the way it should, it may be the face needs to be reset
by Right Click/Reset Texture coordinates and/or To World in the Face Mode
Ok, you got the tool working properly, now you want to make some more interesting stuff, like skies, transparent objects, and parked vehicles right?
I HIGHLY recommend making a small room to test these things out first, nothing is more frustrating that waiting an hour to compile something to realize you forgot to add or change one thing.
3.Getting a sky to work:
-Start by loading a sky prefab from the Prefabs tab in the project window.

You will see that the skybox has been placed to the current location of the green marker, when you paste or import something, its destination will be the green marker. Most likely this will not be where you want it, go ahead and move it out of the level’s playable area.
Make sure you have texture lock ON, so the textures are not misaligned when you move it.
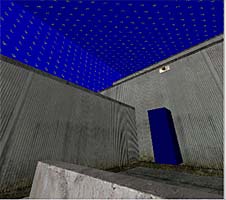
- Now apply the desired surface with the blue colored sky texture from /MISC folder:
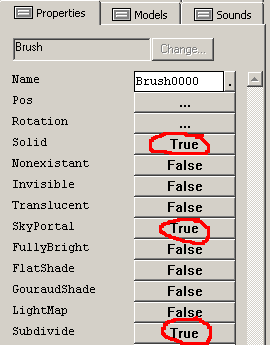
-Now you must instruct the compiler to identify the brushes as sky portals
-Select all the sky brushes, and go to the properties tab, make sure only
SOLID, SKYPORTAL AND SUBDIVIDE is set to “true”
If you followed these instructions closely, your sky should show through any brush that was tagged as a skyportal.
4.Translucent:
So you want to make a ladder or a fence? You’re going to need some translucent action!
So for example, the chain link fence in Quebec, you want to make a thin brush in the shape of your fence, I usually make it 4 units thick. You also have to instruct the compiler to treat this brush as a translucent, go to the Properties tab with the brush (es) selected and turn the Translucent flag to TRUE:

Now you want to apply a special texture called invisible_metalgrate.dtx to ALL sides of the brush except for the side that will actually have the fence texture.
This in effect is an invisible texture so you don’t end up with a fence that has 6 sides (doesn’t look too good), now you could use the invisible texture in /MISC but this one has been altered to allow proper bullet ballistics and has a spark effect added when you shoot through it.
So you can go ahead and select the fence, find the invisible_metalgrate.dtx texture and hit ctrl-T to apply to the whole brush, now we need to apply the fence texture to the one face only. Go into face mode by hitting Shift-A, if you had a brush selected you will find that all the faces are selected by default upon entering face mode, so go ahead and click the face you want to apply the fence texture to.
Now find the rust_chainlink1 texture in the Quebec folder, with the face selected, hit CTRL-T, which should apply the texture to that face only. Now you should have the textures you want, where you want them, except for the scale, I’m sure it looks quite funny right now so in the face editing window (which, by the way, I like to float above the 2d view ports, since the real estate starts getting thin) change the texture scale of the fence texture to .20, a more realistic setting.
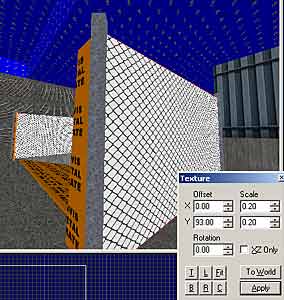
Cool, so now we have a fence, but if I compiled right now, it would not be transparent, it would look solid. The texture itself has an alpha mask so in order for me to activate that mask; I have to BIND this brush to a translucent entity.
This is the important section, read it 100 times if you have to but its positively, absolutely CRUCIAL that the green marker be at the very exact center of the bound brush when you bind it, if you don’t, it will most likely not work well/at all.
So the first step is to select the brush (es) that you want bound, now click the Marker to Selection button, which is on the WorldEdit Toolbar (make sure this is visible by going to View/WorldEdit Toolbar and turning it on):

After doing so, you will notice the Green Marker has been automatically centered on the desired brush (es):
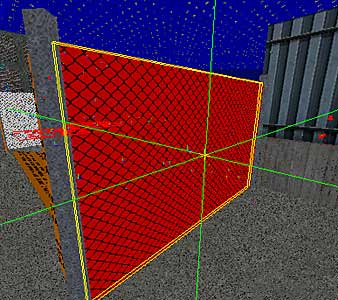
Now if you may bind the brush to an entity, while the brush (es) is selected, right click in any viewport and hit Bind To Object, now from the menu that appears, choose Translucent. Now a little box should appear at the center of your selection, this box represents the entity, in the future you can select it to move and edit it:
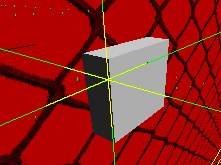
That’s it! After a compile it should look like a fence. See how the Node view has changed for these objects:

As an added bonus, lets use the same process to make some water!
Follow all the previous steps, except for the texture; choose mex_slime01 from the Mexico folder instead. Once you have bound the translucent, select the little entity box for the translucent, since we have to adjust the transparency level or else it will be solid.
Now that the entity itself is selected, go to the properties tab in the project window and see what is there:
-Name – This allows you to name the specific translucent, for easier organization within the nodes window
-POS - This is the XYZ coordinate of the entity, it should be the very center of the brush
-Rotation – Not used in a translucent
-Alpha – This allows you to control how translucent an object is, in the case of the fence, since there is an alpha channel in the texture, you don’t need to change anything. But for the water, 1.0 (default) is solid and 0 is totally transparent, so change this to 4.5 or whatever suits your needs
-Blocklight – By default translucent brushes will not cast shadows, but in case you need it to, set this to true.
After a compile you should have some translucent water!
5.Climbable:
Climbables are pretty simple, they are a brush that when the player enters it, he can move up. Make sure that the brush is large enough for the player to be inside of it, now technically you could have a climbable that is 64x16 but there are some issues with server lag that could cause problems, so we always made them 64x64wide.
It’s important to remember that the climbable is NOT SOLID; it will not serve as a backboard for the player to rub up against as he/she climbs up. So you need to make sure you have a wall/ladder/etc behind the climbable entity. For my example I’ve used what we learned in the translucent tutorial to make a ladder brush textured on 3 sides only, front face and the sides (Ladder texture can be found in Quebec, Uganda among others)
As you can see, I’ve got a translucent entity bound to this 32 wide x 256 high x 6 deep ladder brush:
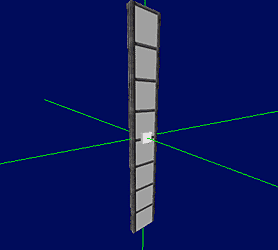
So now create a 36 wide x 256 high x 64 deep brush and texture it with the invisible texture found in /misc. Align it along the front face of the ladder, feel free to slightly embed it into the ladder:
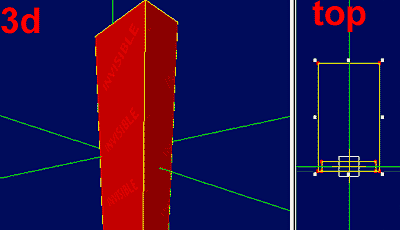
Now with the invisible brush selected, hit the Marker To selection button, since were going to bind this brush to a climbable entity:

Now that you have it centered you can Right Click/Add Object/Climbable and now you should have a climbable bound to the pink transparent brush. Fly inside the brush and select the climbable entity, now I think its only important for single player bots but lets do this anyways, you need to orient the climbable INTO the ladder surface by altering its YAW rotation, you can see the rotation in the view ports by little lines inside the entity box, the YAW line is BLUE.
That’s it! A compile should result in an invisible climbable volume
6.Explodables (Vehicles, etc) and ModelCollision Box setup
This tutorial will only cover how to import exploding vehicles and a few other props from the destructible_emporium.ed file (Included).
First, we need to get a few things straight:
1.LIMITS - Models are details, enhancements; anybody who thinks they can use more than 10 of these per level is FOOLING himself or herself. First think polycounts, these items have many polygons and adding 5-6 cars in view will increase your MODEL polycount by 3000! Second is SpriteFX limits, SpriteFX are how many of the FX in the game are created and pushing this system too hard will result in disappearing muzzle flashes and/or FX that don’t appear AT ALL. So to wrap up, use these things sparingly, I know its hard to resist putting 80 cars along a road but people will not play a map that plays at 2fps, that’s why some of my levels (Quebec, USA, Mexico) are blocky and details used in few places, I wanted framerate OVER pretty, and so should you.
2. Collision Boxes - Bullets, etc will not intersect with the models polygons unless it is turned to SOLID, thereby using the models own built-in collision box OR you build a ModelCollision Box and bind it to the prop/destructible model. Now you will find most built-in collision boxes are way too big/small and just generally unsatisfactory, the reason they are like that is they are limited to being non rotated squares, and that is not acceptable for 90% of the models in the game.
The solution was to make a clip brush of sorts, called a ModelCollision Box which is bound to the desired prop/destructible model, this allows for strange shapes to be create (Migs in Uganda, etc)
3. Placement – You can rotate the props/destructible models, but the FX generators themselves will not be rotated, they need to be painfully re-oriented. It is possible to figure out how these things work, don’t ask me though, that was Mumf’s job, and he claims a tutorial showing how to realign these will come sometime in the near future. That is why we included the destructible_emporium.ed file, within it is every vehicle and rotation we have in the game (I hope), so you can just copy and paste them into your .ed file.
Ok, let start. First load up destructible_emporium.ed, it came with this document so you should have put it in the Crave\Global Operations\Globalops\worlds folder.
There should be several vehicles, 3 MIGs facing 3 directions, a Hydro turbine and several odds and ends, you can compile and run this file to see them face to face. When you do run it you’ll find 90% of the destructibles don’t have collision turned on, we will cover that after we learn how to move them over into your map.
Near the player start you will see a car that is essentially covered with a couple of pink brushes:
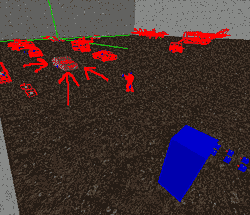
In the node view, it should be called AAA car, I named it this so it would be at the top
See how an Explodable vehicle is put together in terms of various effects:
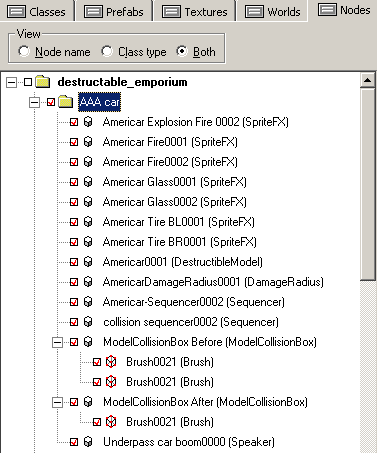
As you can see, there are so many elements involved, its much easier to just copy one from this document, although Mumf promises a more detailed tutorial that explains how to put together an effect of your own soon (minus new models and FX). You can select the little box besides AAA car, and it will select all the elements underneath it, it’s the best and cleanest way to select multiple items, and once again an example of how keeping your map elements organized in the Node view can make life 10000% easier.
So once you click that box, all the elements should be highlighted, now you can Copy (Ctrl-C) them and switch over to your target map and hit Paste (CTRL-V). That’s pretty much it, remember not to rotate or move individual elements or you may find tires coming out of windows and other funny things. Mumf will explain the properties of the various elements involved in his SpriteFX section.
MODELCOLLISION BOXES
Ok, the reason I got you to use the car the first time out was because the Quebec cars have two part collision boxes:
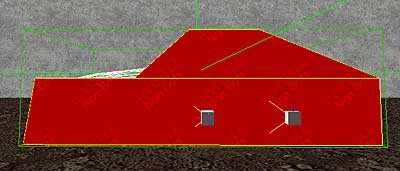
Now I’m going to show you how I did ONLY the before state, since the two-part box relies on using sequencers and other things you don’t understand yet, a later tutorial will cover turning detail/modelcollisionboxes ON/OFF. But you can use this info to make collision boxes for the destructibles that don’t have them.
First thing I did was create a two brush model collision box out of regular brushes that I textured with the Invisible texture in /misc, make sure it encompasses the entire prop, or else it wont block bullets in the areas not covered!
Now you have two pink brushes covering your model, at this point if you were making a simple square one you would only follow the next few steps. Select the two brushes and hit the Marker To Selection button (see I told you would be using it a lot)

Right click/Bind to Object/Modelcollisionbox and hit OK. Now you have two brushes bound to a Modelcollisionbox entity, fly inside and find the entity itself and select it (Or click on it while holding Control in the Node View) and go to properties tab:
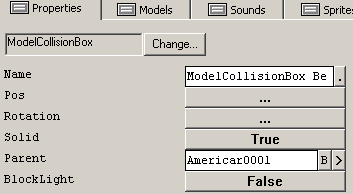
-Name is useful for two things:
Organization and 2.name is used when triggering them ON/OFF
-POS is the XYZ coordinates
-Rotation is not used in this entity
-Solid is used when turning boxes ON/OFF; leave it to TRUE here
-Parent is crucial in the proper operation of this entity, you must put in the name of the prop you surrounded. Not the type of prop, etc but the actual name that appear in the NAME tag in the destructible model, you can see in this case its Americar0001
-Blocklight is the same as you saw in the translucent tutorial, you may want to set it to true if the vehicle doesn’t change too radically but if it does, it may look funny with a huge shadow for an item that doesn’t exist anymore…
Now that you have put in the name of the PARENT, you will notice a yellow line connecting the Modelcollisionbox entity and the PARENT destructible model:
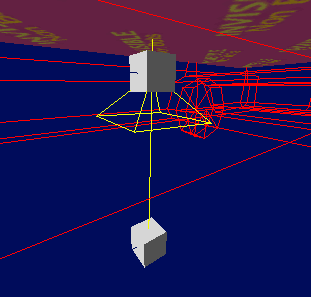
Now that should be it, if you set up everything right you should be able to shoot the car with sparks flying in the all the right spots, remember you can use multiple brushes to create the collision box, the pickup truck in Quebec is made up of many brushes to allow people to hide in the back.
7. Basic Breakable glass
This is a short one; make a piece of glass geometry using the stuff your learned from the translucent tutorial (Turning the brush properties to translucent, etc). You may want to texture both side (But NOT the edges) of the brush depending on the look you want, you will need to experiment with this to see what you like. Use the glass from /props for starters, now that you have it textured, hit the trusty Marker to Selection button:

Right Click/Bind To Object/Destructible and hit OK.
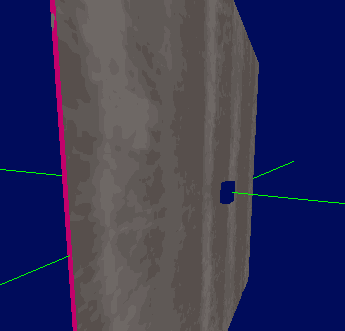
Now select the entity by itself and go to the properties tab:
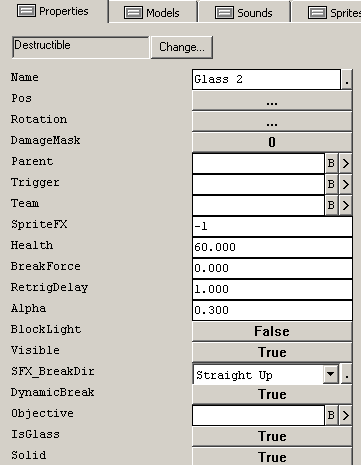
The only different/use tags here are:
-DamageMask: This determines what the glass requires to be broken, pretty self explanatory
-Trigger – Will trigger once glass is broken
-Team – only will let that team destroy the glass
-Health – Health of the glass, for bulletproof set to 9999, I use 60 for industrial glass
-Alpha – Sets the transparency of the glass, play with it, I used 0.300
-Dymanicbreak – Set to true for best breakable glass
-Objective – Name of objective triggered upon glass breaking
-Isglass – Set to true
-Solid – Set to true
That’s it! Compile and SHOOT.
7.Compiling
Compiling is pretty standard stuff so lets go over the few options you have:
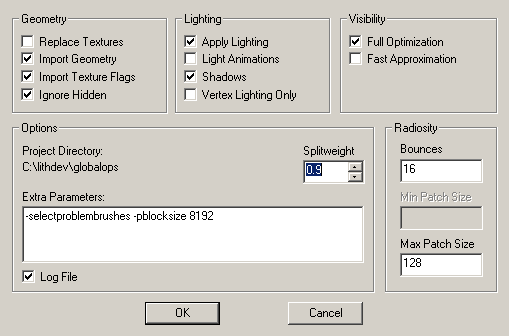
Geometry:
-Replace textures - Do not use
-Import geometry – Turning this off will allow you to redo lighting
-Import texture flag - Keep on
-Ignore Hidden – Unless this is on, the compiler will include hidden items and geometry
Lighting:
-Apply lighting – Turning this off will skip the lighting pass
-Light animations - Not used
-Shadows – Shadow application will be skipped but lightmaps still applied
-Vertex Lighting only – Skip lightmaps but still generate basic lighting (vertex)
Visibility:
-Full Optimization – This should be on when you want an accurate idea of the visibility of your level, it will do as much optimization as possible but may take a long time.
-Fast Approximation – Adding this flag will make a quick VIS compile but will do no VIS blocking, but is good for testing
Splitweight – Keep this to 0.9
Radiosity
-Bounces - This determines the amount of times the light is bounced around during the radiosity lighting pass, a minimum of 6 and maximum of 24 is recommended
-Max patch size - Keep this to 128
Extra parameters:
-Selectproblembrushes: This instructs the processor to stop the compile when it comes across an invalid brush. If you close the map down, and re-open it, the problem brush will be selected.
-Pblocksize 8192: This has to do with the physics processing of the map. Using this you will see improved compile times, with minimal impact on performance of your world.
-Indirectsky (scale between 0-1): This only works with staticsunlight entities. What it does is add a lot more sampling to all of the polygons affected by the sunlight (by this i mean it takes a poly where light is being hit, and casts out rays in a hemisphere from the center of that poly), creating a much more natural looking outdoor light. Using this parameter will seriously effect your compile times. For most of the GO levels, we used .7-.98.
-Directsky (scale between 0-1): Like indirectsky, directsky effects only the polygons hit by the static sunlight. Directsky determines the intensity of all direct light in the level. Turning this down makes the shadows created by the sunlight less apparent. Basically the lower the value, the more of an overcast look your level will have.
That’s it for now, look for more tutorials soon!