Adding Sky to Your NOLF Level
This tutorial describes how to add sky to your NOLF level, either using the prefabs or creating a sky using NOLF textures.
Add some SkyPortals
Before you can add a sky to your level, you must first add some skyportals. Skyportals are brushes that tell the renderer where the player will see the sky. Here’s how to set them up (See figure 1.):
- Add brushes in your level where the sky is to be rendered.
- Assign the Sky texture.
- Set the SkyPortal property to TRUE.
- Make sure to set the brush properties LightMap, Subdivide, and GouraudShade to FALSE.
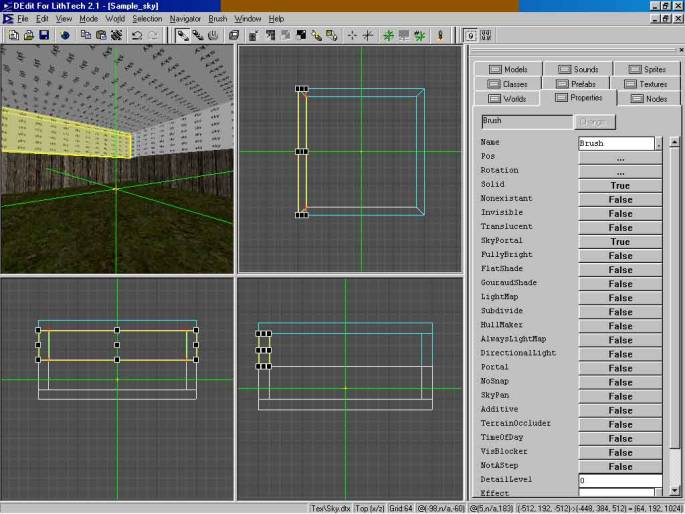
Figure 1: Adding SkyPortal brushes
Using a prefab sky from NOLF
If you have downloaded the NOLF prefabs, you can use a sky from NOLF, by simply double-clicking on the description of the Prefab type in the Prefabs tab. Under the “Skies” directory in the prefab tab’s list, the skies are divided into two groups: Simple skies and Complex skies.
The simple skies are composed of a hollowed out cube with the inside textured by a set of six textures representing the sky. When using a simple sky (called a “skybox”) it is best to check your WorldProperties object’s FogInfo properties, and make sure SkyFogEnable is set to FALSE.
Most complex sky types in NOLF often require the SkyFogEnable values to be set, in order for the sky to look right. Usually most skies work well with a SkyFogNearZ value of 0 to something like (-256) and a SkyFogFarZ value between 256 and 800, depending on the sky used. Experiment with the SkyFog color values to find an appropriate color to the sky. Refer to the sample maps for reference.
Once you place your sky prefab, make sure to move the prefab to the outside of your level. A good place for the sky prefab is underneath the level, so that the actual geometry won’t show through the skyportals like a box hanging in the sky. (See figure 2.)
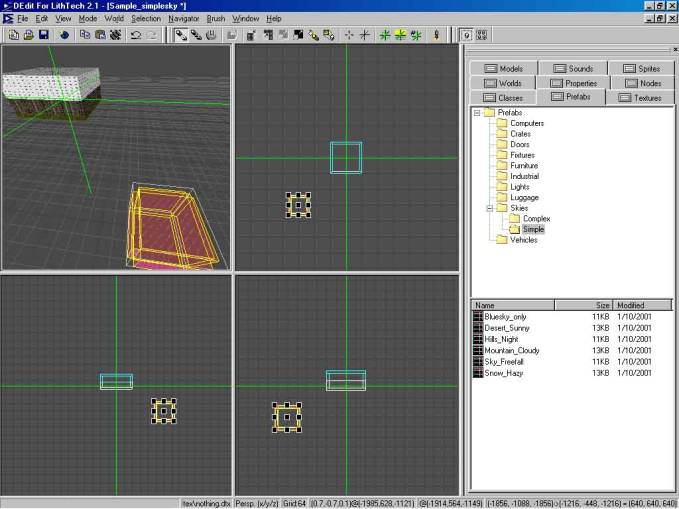
Figure 2: Placing the Sky Prefab
Creating a new sky using NOLF textures
If you have the NOLF resources but did not download the NOLF prefabs, then you can create the same skies manually. Here’s how to create the simple skybox (See figure 3.):
- Build a hollow box out of the view of the level. A good place is underneath the level, so that the actual geometry won’t show through the skyportals like a box hanging in the sky. Make sure the box is large enough to give you good working room (512x512x512 is a decent size)
- Set the FullyBright property to TRUE.
- Set the brush properties LightMap, Subdivide, and GouraudShade to FALSE.
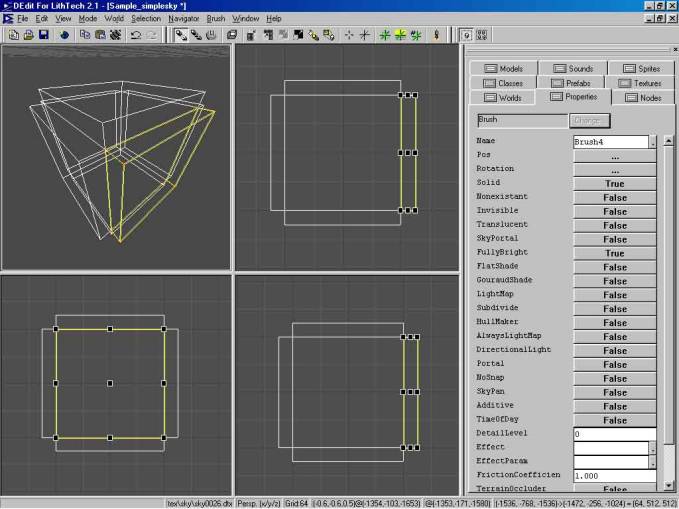
Figure 3: Creating a new sky using NOLF textures.
With the box geometry ready, place the crosshairs in the center of the box and bind the geometry to a DemoSkyWorldModel. In the Properties tab, set all the InnerPercent fields to “0.001” to preserve a static sky, otherwise your sky will move around in proportion to the player movement (parallaxing). Next, set the SkyDims of the object equal to the inner walls of the box.
Example: for a 512x512x512 cube, set the dims radius to 256x256x256. Texture the insides of the box with the appropriate textures mentioned earlier and you’re set. For a simple static sky, this may be all you need. (See figure 2.)
Next, texture the insides of the cube with the appropriate set of sky textures. In the Textures tab, browse for the Skybox directory under Sky. Usually a set of skybox textures will consist of six different textures, one for each side of the box. The name’s extension depicts the position of the texture like so:
- freefall_bk the back face of the cube.
- freefall_dn the bottom face of the cube.
- freefall_fr is the front.
- freefall_lf is the left.
- freefall_rt is to the right.
- freefall_up is the top face of the cube.
Inside the cube, texture a face with the front texture first, and then use that as the reference to apply the rest of the textures.
If you want to create your own skybox textures, typically you will need a 3D package such as Bryce3D, 3DStudio Max or any other 3D package that will allow you to render a 3D scene into the six images needed to accomplish the effect. As an alternative to 3D, you can use a paint program such as Painter or Photoshopto paint a sky utilizing a shareware plug-in named Skypaint. Skypaint is a handy little tool that can aid in setting the correct field of view of the painting andit assures that the cubic form of the geometry will not show in the perspective of the textures.
For more information on SkyPaint, visithttp://www.wasabisoft.com/
Creating a new complex sky using NOLF textures
A complex sky goes beyond a static skybox. They usually contain more than the skybox object, such as panning clouds, or a sunflare, or sometimes even a keyframed object. Refer to the Sample_complexsky level for construction.
In order to create a good complex sky, it’s best to start with the simple skybox first. Keeping the skybox ensures that we will never see the void of 3D space, sometimes resulting in the mirror/shearing effect. Also, the DemoSkyWorldModel’s object center of the skybox provides a reference point, acting as the sky camera. Be aware that any objects added to the sky scene will use the DemoSkyWorldModel’s object as a reference.
The first modification to the original skybox is to retexture it. Since we’ll be adding objects for visual effects, we can replace the six larger textures with a smaller tiling texture, which is more memory efficient. For this example use a blue color for a daytime sky. Open the Texture tab and select “sky0026” which is in the Sky Texture directory. Next, resize the skybox to allow more working room; for this example, 4096x512x4096 will do well. When you resize the geometry make sure the DemoSkyWorldModel object stays in the center, and reset the dims to 2048x256x2048. (See figure 4.)

Figure 4: Creating a new complex sky using NOLF textures.
Now the stage is ready for other objects to be added to the scene. The first object to make is the clouds object. Add a 4096x64x4096 brush about 64 units above the center of the DemoSkyWorldModel object center. Texture the entire brush with the invisible texture so that all the other five sides of the brush will render invisible at runtime. Then in Geometry Mode, texture the bottom face with a clouds texture with an appropriate alpha mask. For this example, use “sky0010” in the Sky Texture directory. Right-click on the textured face and select Map Texture Coordinates and set the U and V fields to 256. This will keep the testure from repeating too much in the sky.
Bind this brush to a TranslucentWorldmodel object and set the brush properties to:
- Subdivide = False
- LightMap = False
- GouraudShade = False
- Translucent = True
- FullyBright = True
Make sure the TranslucentWorldmodel’s FogDisable property is set to FALSE, since you want the SkyFog to fade the cloud layer to the horizon. Also set the Alpha property to any number <1, such as 0.99, or less if you want the clouds to be more translucent. In the TranslucentWorldModel Name field, enter Clouds1. (See figure 5.)
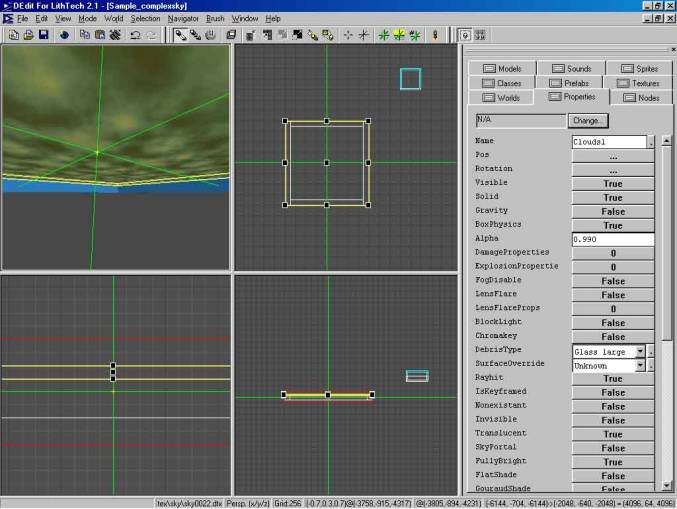
Figure 5: Cloud construction.
NOTE: When working with more than just the DemoSkyWorldModel in the sky scene, it is best to name all the objects to a more descriptive term, such as changing the DemoSkyWorldModel name to “skybox” and the TranslucentWorldModel name to “Clouds1”. This will also make the next steps a lot easier to deal with.
In order to get the clouds to appear to move, you must open the brush properties, and in the Effect field, enter Pan, and in the EffectParam field enter two values. The first is the panning speed in the positive X direction of the cloud texture in texels per second and the second is the panning speed in the negative Y direction in texels per second. Negative values can be entered to reverse the direction. For example, entering -64 128 will pan the texture diagonally, 64 units per second to the left and 128 units down. Because these values are relative to the texture, you can rotate the brush or the texture itself to modify the direction, as well as scale the texture to affect the speed. Sometimes if you cannot detect the cloud texture panning in the sky, try setting the EffectParam to a higher value, since scaling the texture and the distance of the cloud layer to the camera (the DemoSkyWorldModel object) can affect the appearance of the speed.
NOTE: If you only want to add the cloud layer, without any other objects, there are a few more steps required in order for the clouds to work. Refer to the section on Index ordering multiple sky objects.
Adding the Sun and the SunFlare object
The next detail you can add to the sky is a sun. Copy the TranslucentWorldModel and rename it to “Sun”. Replace the cloud texture with “invisible”. Then go into the brush properties and delete the Panning values in the Effect and EffectParam fields (otherwise your flare will pan) and set the Additive property to TRUE. Also set FogDisable to TRUE.
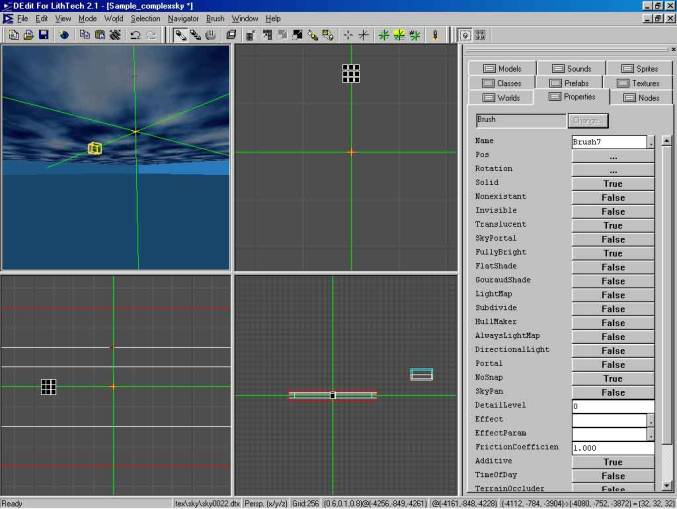
Figure 6: Positioning the sun cube.
Next, resize the sun geometry to a 32x32x32 cube. Position the sun cube so that the closest face is 192 units in the positive Z direction (North in the top viewport) from the center of the DemoSkyWorldModel object. (See figure 6.) Unselect the geometry and just select the Sun’s object, and position it in the center of the skybox, at the same point of the DemoSkyWorldModel. Copy the sun and rename the copy “SunFlare”; you’ll use that later, but you can hide it for now. Select the original sun again and in the left viewport, right-click and select Rotate Selection and in the field enter -35 (be sure that your green crosshairs are at the center of the skybox). This will position the sun a bit higher in the sky, and keep the front face aimed at the camera. Go into Geometry Mode and select the side of the cube facing the camera, and apply a sun texture such as “sky0027” in the sky texture directory. (See figure 7.)
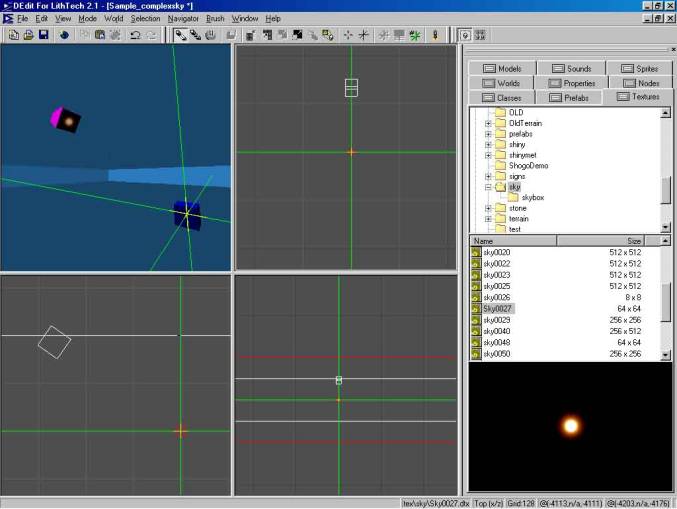
Figure 7: Applying texture to the sun
NOTE: When applying textures to an additive worldmodel, it is important that the texture is completely black where the texture is to be transparent, otherwise you will see the whole square of the face in the sky.
Fit the texture by right-clicking on the face and selecting Map Texture Coordinates, and in the U and V fields, enter 32 to scale the texture to the size of the cube. To align the texture, keep the face highlighted and press the K key several times until the sun is centered. Now that the sun is ready, move on to the sun flare.
Unhide the “SunFlare” copy of the sun, and scale up the height and width to 256 units, keeping the thickness the same as the sun. Select an appropriate flare texture, such as “sky0027” and, as you did with the sun, fit the texture to the face. Then rotate the SunFlare geometry in the left viewport by -35 to match the angle of the sun. Now to give the flare effect, in the TranslucentWorldModel’s properties, set LensFlare to TRUE, and under LensFlareProps, set InSkyBox to TRUE. Now that the clouds, sun and sunflare objects are all created, you need to set them up to render in the sky.
NOTE: If you only want to add the sun or sunflare, without any other objects, there are a few more steps required in order for the objects to work. Refer to the next section Index ordering multiple sky objects.
Index ordering multiple sky objects
Setting the rendering order of all the sky objects is the most important step in creating the complex sky type. This is done in the Index field. Because the DemoSkyWorldmodel is the only worldmodel type with an Index field, you have to add a SkyPointer object to your sky scene for every object to be added after your skybox, or else these objects will not show up in the sky. The SkyPointer object references the worldmodel and has an Index field for that worldmodel.
Start by adding a SkyPointer for the clouds layer (it is recommended to place all objects without geometry at the middle of the skybox). Then fill in the name field with a descriptive term such as “Clouds1Skypointer” and then set the name of the TranslucsentWorldmodel in the SkyObjectName field to “Clouds1”. Continue adding SkyPointers for each worldmodel object in your scene (with the exception of the DemoSkyWorldmodel skybox).
Now that there is an Index field provided for each object (via the new SkyPointers), set the ordering of all the objects for the sky. Start by opening the properties of the DemoSkyWorldModel (skybox) and in the Index field, enter 0, and then select the Clouds1SkyPointer and set the Index to 1. Now the game engine knows to draw the Skybox object first, then the clouds layer next, drawing the clouds in front of the blue sky. Continue adding more objects in your sky as needed, while adding SkyPointers and updating the Index for all the objects, and your set.
Typical Index settings for a scene
- Skybox = 0
- Sun = 1
- SunFlare = 2
- Clouds1 = 3
- Clouds 2 = 4
- Trees = 5
The final polish
Once the sky is fully functional, you can add fog to hide the edges of the clouds. To do this, go into the WorldProperties object and make sure that FogEnable is set to TRUE. In the FogInfo, set the SkyFogEnable to TRUE, select white for the FogColor, then set the SkyFogNearZ to 0 and the SkyFogFarZ to 800. As an alternative to using fog to fade in the clouds, you can add other objects around the horizon in front of the clouds (such as trees or buildings), just as you did with the sun.